If you’re looking to create a professional eCommerce website, Elementor and WooCommerce are two great tools that you can use. In this article, we’ll show you how to combine the two to create a powerful online store. We’ll walk you through the steps of setting up WooCommerce, and then we’ll show you how to create beautiful pages with Elementor.
By the end of this article, you’ll have everything about how to build an eCommerce website using WooCommerce, Elementor, and WooLentor.
Read also: WooCommerce Vs Magento: Which One is the Best eCommerce Platform
What is WooCommerce and how does it work
WooCommerce is a WordPress-based open-source eCommerce platform that allows you to convert your WordPress site into an eCommerce business. It is a popular option for small businesses and entrepreneurs who are looking to set up an online shop without a lot of hassle or expense. WooCommerce is free to use and offers a wide range of features, making it a versatile platform for creating an online store.

Setting up WooCommerce takes only a few minutes, and once it is installed, you can start selling products right away. WooCommerce comes with everything you need to get started, including a Shopping cart abandonment, a payments gateway, and inventory management.
You can also add additional features and plugins to extend the functionality of WooCommerce. Overall, WooCommerce is a user-friendly platform that offers a lot of flexibility in terms of design and functionality, making it an ideal solution for setting up an online store.
Benefits of using WooCommerce and Elementor to Build Your Online Store
WooCommerce and Elementor are two great platforms to consider if you’re interested in setting up an online store. WooCommerce is a popular eCommerce platform that powers over 30% of all online stores.

Elementor is a powerful page builder that makes it easy to create custom pages and designs. Over 5 million people actively use Elementor on their WordPress site for good reason–it’s a drag-and-drop page builder that requires no professional help to create a beautiful website. With just some clicks, your site will be ready to go live!
Here are some of the benefits of using WooCommerce and Elementor to build your online store:
- WooCommerce is a powerful eCommerce platform that is easy to use and scale.
- Elementor provides a drag-and-drop interface for creating custom pages and designs.
- WooCommerce and Elementor are both SEO friendly, so your store will be easily found by search engines.
- WooCommerce and Elementor are both responsive, so your store will look great on all devices.
- WooCommerce offers a wide range of features and plugins to extend your store’s functionality.
- Elementor provides a wide range of widgets and add-ons to extend your store’s design.
If you’re looking to build a powerful and flexible online store, WooCommerce and Elementor are two great platforms to consider.
Things You Need to Build a Professional Online Store Using WooCommerce and Elementor
Here are the things using which we will build a superb and professional-looking online store:
- A WordPress Site
- WooCommerce Plugin
- Elementor Page Builder
- WooLentor (A freemium WooCommerce Elementor Page Builder Add-ons Plugin)
Setting up an Online Store Using WooCommerce and Elementor: A Step by Step Guide
WooCommerce is one of the most popular WordPress plugins, and it’s no wonder why. WooCommerce allows you to turn your WordPress site into a fully functioning online store, complete with all the features you need to sell products and take payments. And best of all, WooCommerce is free to use.
In this article, we’ll show you how to set up an online store using WooCommerce and Elementor, two powerful tools that work great together. We’ll walk you through each step of the process, from installing WooCommerce to setting up your payment methods and shipping options.
By the end of this article, you’ll have everything you need to start selling products online. Let’s get started!
Step-1: Set up Domain and Hosting
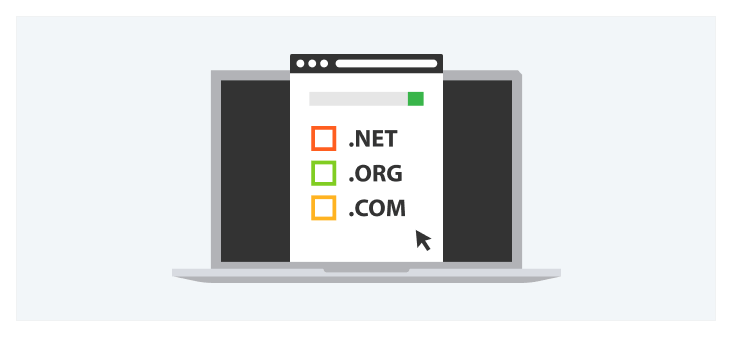
Before you get started with an online store, you will need to purchase a domain name and hosting plan. Your domain name is what potential customers will use to find your website, so it’s crucial to choose something that is simple to remember and accurately represents the products or services you offer.
Once you have chosen a domain name, register it with a hosting provider. You can usually do this through the same provider, and many hosts offer discounts if you buy both services together.
Out of all the steps, choosing a hosting plan and then buying it is the most important. There are countless hosts that work with WooCommerce, each has different advantages and disadvantages.
Depending on your budget, there are plenty of options for you to choose from. The fees for these services typically depend on how much space you need and how quickly you want information transferred(bandwidth), as well as what kind of website you’re making.
It is critical to think carefully about your requirements before making a purchase. If you want to run a popular website, for example, you’ll need a service that offers limitless bandwidth and storage. You’ll then need to get a hosting plan after selecting a provider.
Hosting plans may vary in price. With some effort, you can definitely discover the ideal hosting plan for your website.
Step-2: Install WordPress
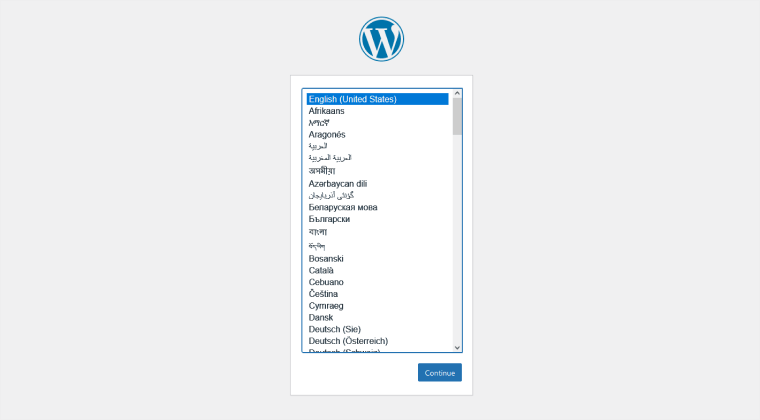
It’s time to set up WordPress now that you have your web hosting account and domain name. The procedure is typically simple, taking only a few minutes. Many web hosts provide a one-click install option for WordPress, making the process even more convenient. If your host does not provide this functionality, do not be concerned; manually installing WordPress is still quite simple.
You can usually follow WordPress.org directions. Get their software from the website, set up a database for it on your web server, and upload everything to run the install script. If you do this right, you’ll have a complete WordPress site!
Step-3: Choose a WordPress WooCommerce Theme
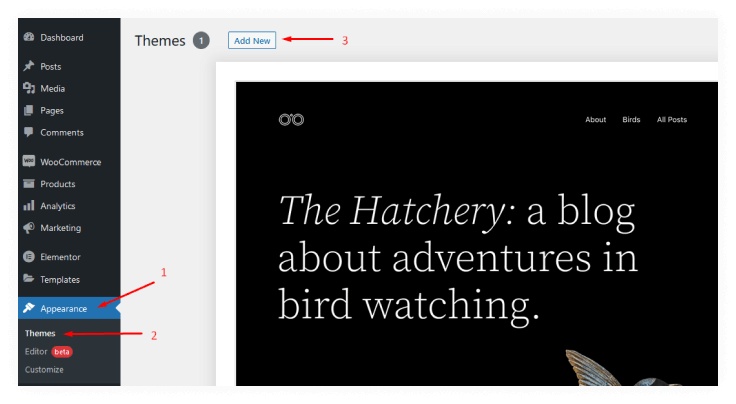
The next step is to choose a theme, and head over to the Appearance > Themes page in WordPress. Here, you’ll see various themes available for both free and purchase. If you go with a free option, simply click “Activate.” But if you select a premium theme, buy it first before uploading it onto your site. After the theme is activated, then WooCommerce installation can begin.
To make your site appear attractive on all devices, pick a theme that is both mobile-friendly and search engine optimized. Responsive themes will automatically alter their layout to fit the size of the screen they’re viewing – whether it’s a phone or a computer!
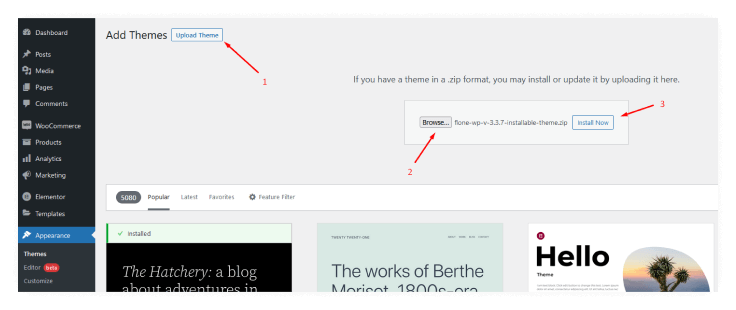
Flone – Minimal WooCommerce WordPress Theme is such a highly responsive and creative Website design. Flone considers the market and anticipates future trends in order to provide high-quality demo websites. Flone WordPress theme successfully integrated all of the key elements of quality and ease of use.
Flone is an excellent theme for entrepreneurs who want to make their site stand out. It comes with 7 different header styles, 25+ sections,, and 4 footer options that will keep you up-to-date on the latest trends.
Multi-Currency allows your customers from all over the world to pay easily via PayPal or Credit Card without converting currencies first which saves them money in commissions fees;
Step-4: Set up The WooCommerce Plugin
Install and Activate the WooCommerce Plugin
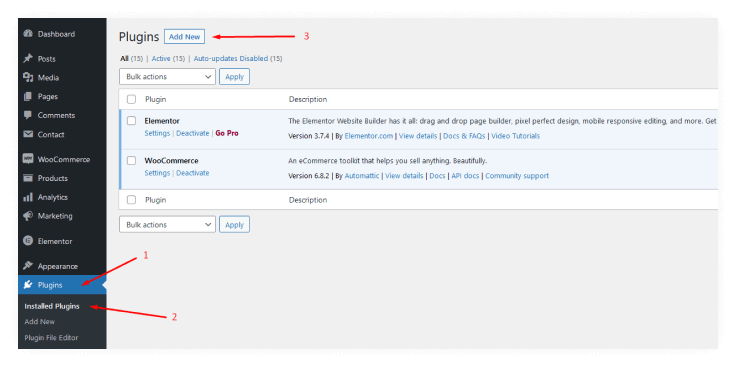
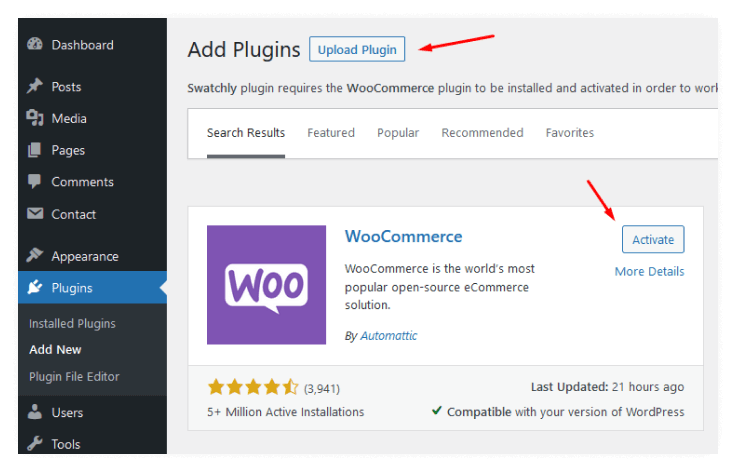
Go to the WordPress Admin Dashboard and select Plugins.
Then, search for “WooCommerce” in the “Add New” section. After that, install the plugin by clicking “Install Now” and selecting ‘Activate’.
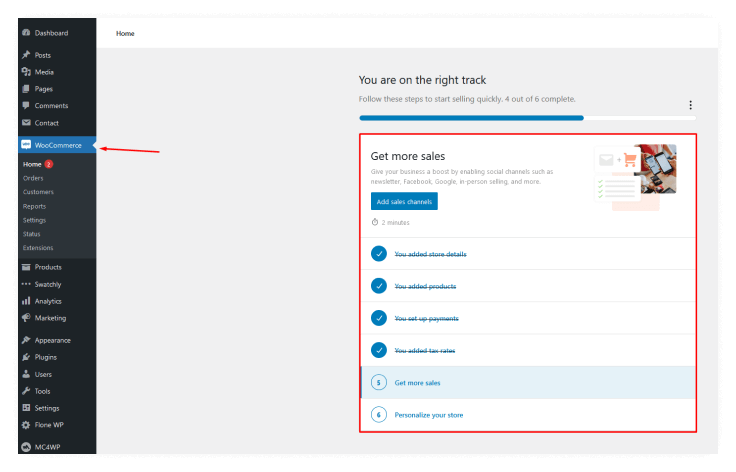
Now you’ll be given a setup wizard. It’s better to go through everything and make all of the necessary modifications as needed.
We will select “Continue” in order to begin the setup wizard.
Put Basic Information of Your Store
To begin, it wants basic information about your stores, such as its location and the sort of items you’ll offer, and what currency you use. It also asks what types of goods you are selling: physical items, digital products, a combination of both, in-person transactions, or something else entirely.
You also have the ability to determine whether you want WooCommerce to track your usage for store improvement. After filling out the form, click on the ‘Continue’ button at the bottom of the page and move on to the next settings.
Configure the Payment Options, Gateways, and Extra Options
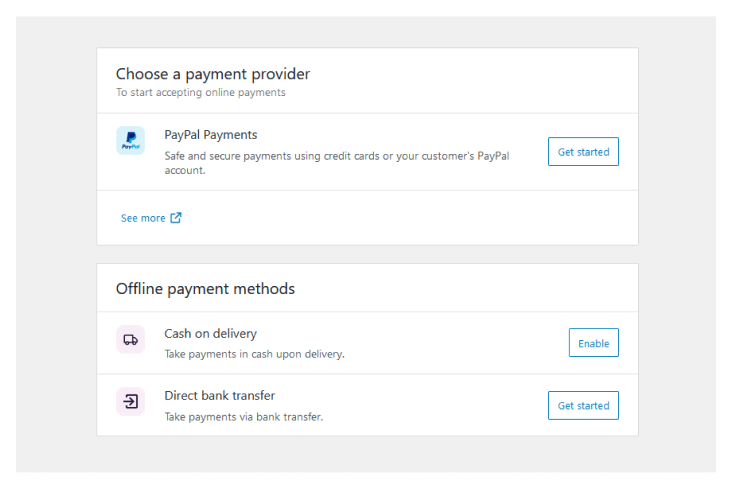
After you have done that, the next step is to pick a payment gateway for your store. Some of the choices WooCommerce supports are PayPal, Credit Cards, and Stripe. The payment options for your online store depend on your location and what type of products you want to sell.
If you didn’t select the option to “sell products in person”, then you’ll only have Stripe and Paypal as options. If you ticked the checkbox and live in Canada, Australia, the U.S., Japan, or the U.K., then Square, Paypal, and Stripe will be available to you because those are the countries where those payment gateways operate.
On the payment page, select ‘Offline Payments’ from the drop-down menu. You can then choose to pay by check, bank transfer, or cash. Once you have finished all the settings, click ‘Continue’ and proceed to the next step.
Next, you will be focused on shipping your product details. WooCommerce supports two (2) shipping zones: Zone 1 is the United States and Canada, and Zone 2 is the rest of the world.
If your store is located in Zone 1(USA & Canada), then you have the option to get a live shipping rate. However, you can also set a flat shipping rate or free shipment if preferred. You just need to make sure that the weight and dimensions are accurate for whatever shipping rate you decide on.
Once everything is all set, click ‘Continue’ and print out your credentials by selecting ‘Print Shipping Labels at Home.’
At this point, the WooCommerce installation wizard asks if you want to install certain essential plugins such as Jetpack’s automated taxes and MailChimp for email marketing. Whatever is required for your eCommerce website may be chosen. To do so, simply check the box next to each one to have them installed automatically on your site, or later manually.
Link the WooCommerce with Jetpack and Complete the Setup

The setup wizard now asks you to link your site with Jetpack, as previously stated. This plugin is outstanding at ensuring the greatest security while simultaneously allowing for all of the functionality for automated tax.
Click ‘Continue with Jetpack’ and you’ll arrive on the last page of the wizard. You have a variety of options from this page. Simply check and continue without further ado.
Step-5: Add Products to Your WooCommerce Store
You can now start adding products to your online shop. As you may know, there are a lot of ways for inserting new items into the website and we’ll show how this works in our example below:
Go to WordPress Dashboard and Add New Products
To add a product to your WordPress website, follow these steps:
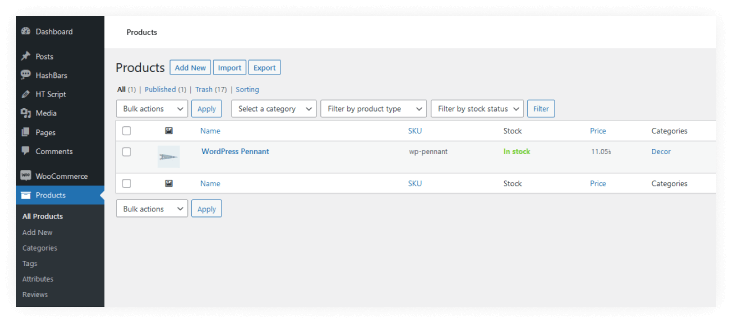
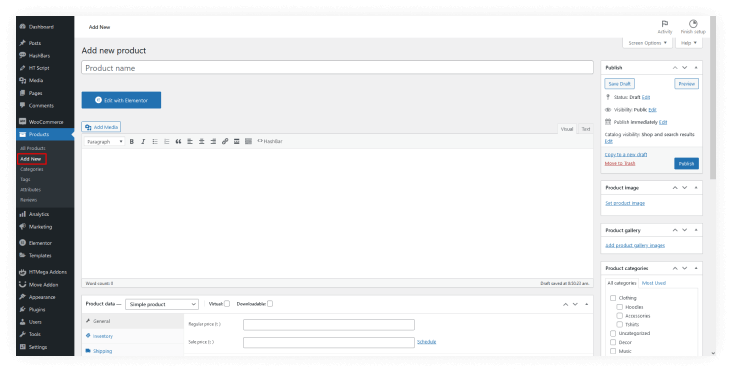
1. From your dashboard go to Products and then Add new.
2. Here you can insert the information about your product, including its name, category, image, tag gallery description, and more.
3. Be sure to include all relevant information for each of your products as you add them one by one to your online shop
Set Product Data
The panel located under the main editor is where you will set your product data. Pay close attention while customizing this information to ensure a flawless experience in your shop.
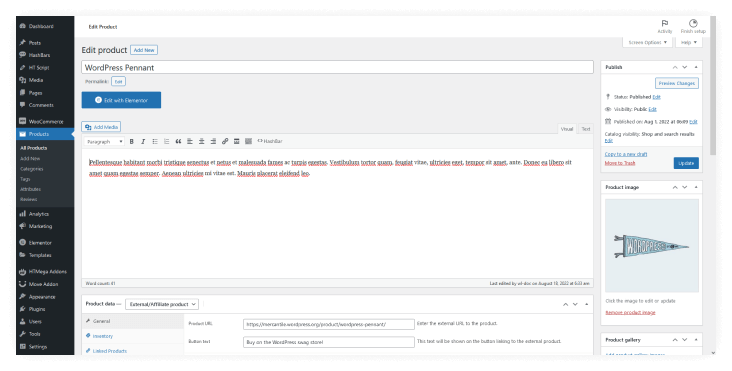
To begin, choose the data type of your products from the drop-down menu such as Simple product, Grouped product, External/Affiliate product, and Variable product.
Depending on your business niche, industry type, product categories, and other factors, different configuration options will appear. Set all the data accordingly and check the product from ‘All Products’ once you’re done saving.
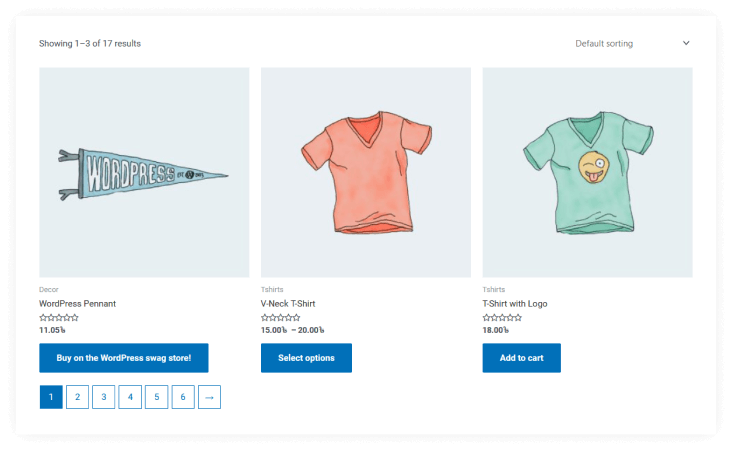
Check How Your Products Look
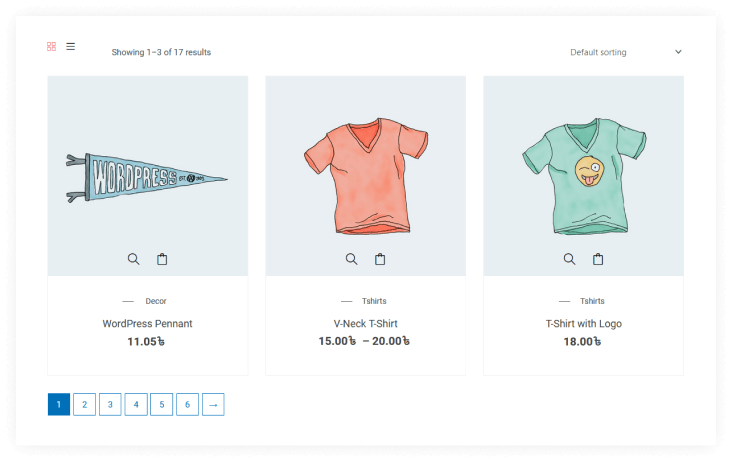
You have completed all the necessary tasks. Now it is time to see how your online store and products look to customers. This is largely determined by the theme you’ve chosen. It also depends on which one you picked.
Step-6: Install and Activate Elementor for Designing Your WooCommerce Store
Elementor is the perfect solution for those looking to create professional-looking websites without having any coding knowledge. With this simple but powerful tool, you can add text and images while also including videos or buttons on your pages–all with just one click!
With Elementor’s wide range of features, options, and widgets it can be customized in so many ways! You can easily drag and drop elements to create custom pages and templates. You can also use Elementor to customize your WooCommerce products as well.
How to Install Elementor
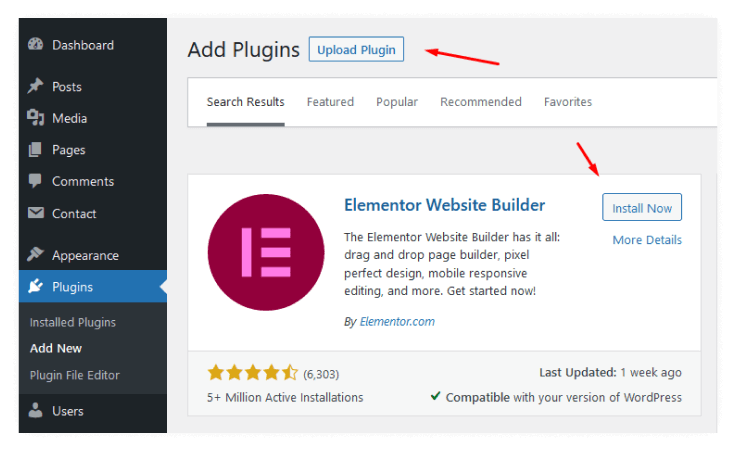
To install Elementor, log into your WordPress dashboard and go to the Plugins section. Then, click on the Add New button and search for Elementor.
Once you’ve found the plugin, click on the Install Now button and activate the plugin. After that, you’re ready to start designing your WooCommerce store with Elementor!
Or, if you prefer a manual process, download Elementor and upload the file using the ‘Upload Plugin’ option. Once that is completed, follow these steps to begin designing your store pages:
Before you can start selling your product, you need to create a product page. With Elementor, you can fully customize your online store to better match your brand and meet the needs of your customers.
Use Elementor to construct a product page

To develop a product page to display the features of a certain item, follow these steps:
To use Elementor, start by going to Pages on your WordPress Dashboard. Then, click “Add New.” From the right-side template dropdown, select Elementor Canvas. Lastly, click “Edit with Elementor” to begin.
You have a lot of options for structuring your page, including utilizing a pre-designed template or block or developing each component separately. Furthermore, you can use third-party add-ons to extend the capabilities of your template library. To build a distinct component, you may utilize many sorts of helpful widgets.
We’ve used WooLentor Elementor Add-ons Plugin to get the most out of Elementor’s robust capabilities.
Complete your design
You have now successfully completed all of the settings. The next step is to publish the page, but first, you need to set the condition to show the page under a specific category. This will help potential customers find your store more easily, and it will also help to improve your store’s search engine ranking.
You can design all of your other pages in this way as well–there are no limitations. All you have to do is think of a design and then create it using different widgets.
Step-7: Use WooLentor Elementor Add-ons Plugin for Extensive Elementor Features
Overview of WooLentor Plugin

The WooLentor plugin provides everything you need to create your own successful online store. It has 19 modules and 91+ widgets for choosing from so it’s easy enough! Plus there are powerful page builders which let users quickly make custom pages or templates in no time.
WooLentor includes a lot of features that are designed to help you increase your sales and conversion rate. Some of the key features include:
- A number of pre-built page templates can be used for WooCommerce stores
- A visual drag and drop page builder that makes it easy to create custom WooCommerce pages
- A powerful set of WooCommerce modules that can be used to add extra functionality to your store
- A wide range of WooCommerce widgets that can be used to add extra features to your store
- An excellent responsive design that fits all devices.
- A dedicated customer support team.
WooLentor provides an incredible selection of customizable widgets, with the ability to customize your site in many different ways. You can use the product grid and customer review system as well as the Ajax search form for increased functionality on your website!
WooLentor also offers a range of templates to help you design your site in an easy and efficient way. Shop Templates, My account templates, Checkout templates, and more – WooLentor has got you covered with its advanced template options.
Moreover, this versatile and powerful Elementor-based WooCommerce page builder plugin makes it easy to personalize the look of your WooCommerce store with various modules such as Sales notification, Flash sale countdown, Product compare, Email customizer, and Shopify style checkout.
In all, WooLentor is a one-stop shop for all your WooCommerce needs.
Customizing WooCommerce Store Using WooLentor
With the help of WooLentor, you can make your website more interesting and attractive by customizing it. It has a wide range of features like adding blocks or pages in just seconds with an easy interface that even beginners will be able to understand easily!
Install and Activate WooLentor
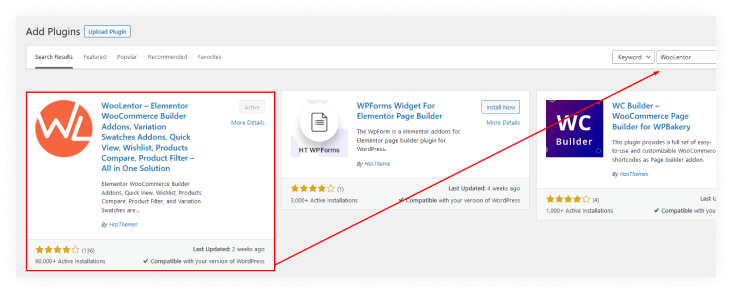
To get started with WooLentor, simply install and activate the plugin from your WordPress repository.
If you want more premium features then go for the WooLentor Pro version which has different packages according to budget. You can get the pro version from their website.
Go to WooLentor Menu
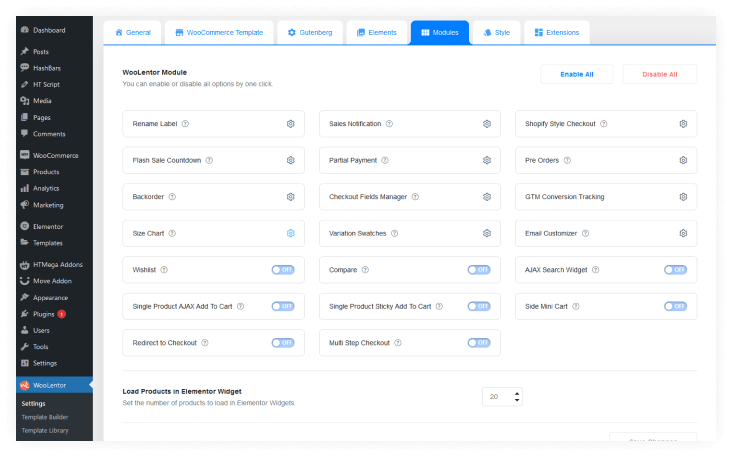
Now head to WooLentor’s menu. At this point you will be taken to a page where all of WooLentor’s different features are listed.
Navigate to the Template Builder and Go to Add New
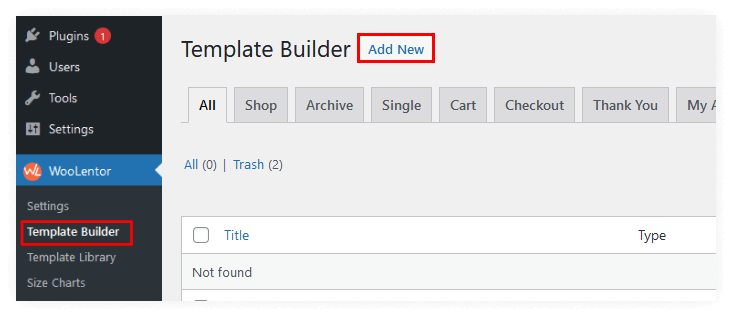
Navigate to the Template builder from WooLentor’s menu in your WordPress dashboard
and go straightaway to adding a new one!
Configure the Page Template Settings to Build Your Desired Page
The next step is configuring your desired page template so that it can build an optimized version.
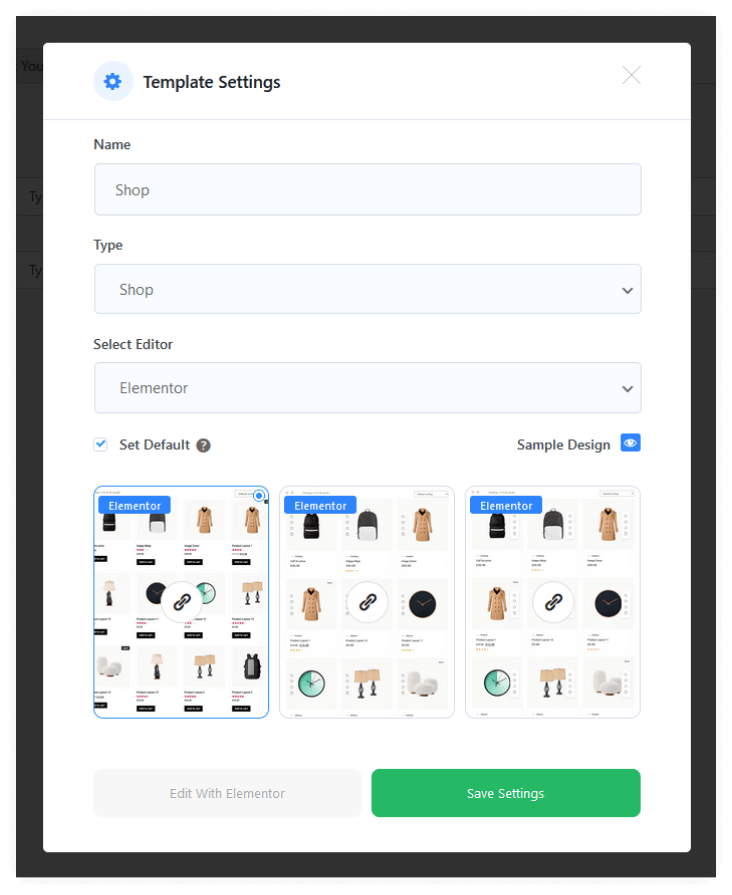
Click on “Add New” to create your desired page template. Once you do this, a popup window for Page Template Settings will appear where you have the option of giving it any name and choosing types of templates.
If you want to use the template as the default page, check the “Set Default” box, and save your changes.
Customize the Page Template with Elementor
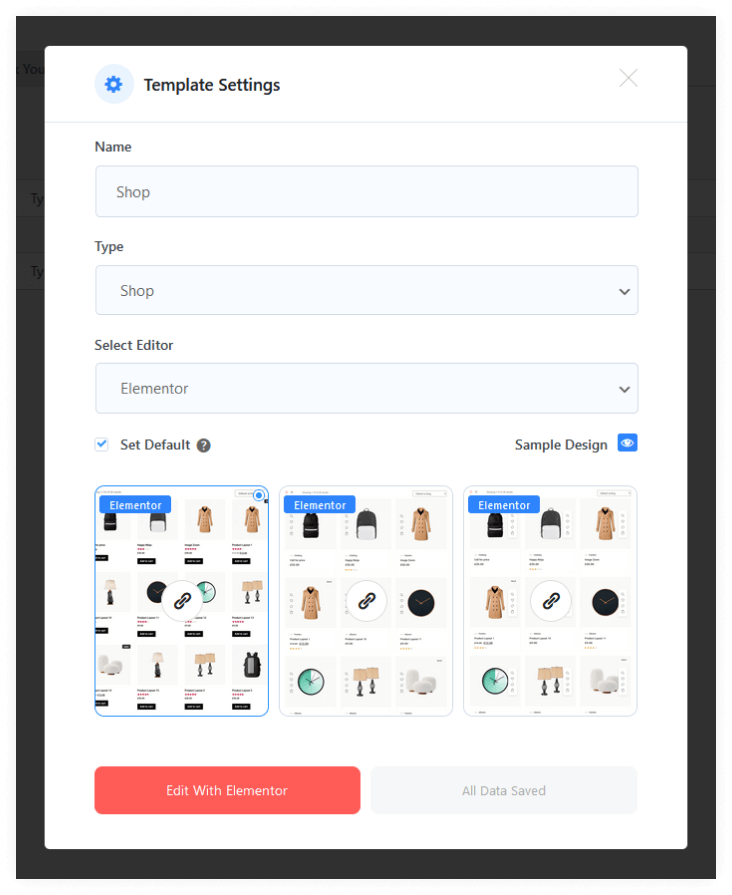
You can use Elementor widgets to change and customize the template based on your preference after you’ve saved the parameters. There are several pre-made templates for various pages available.
If you want to utilize them, go to “Sample Design” in the pop-up window, and then the pre-made templates for that page will appear. You may choose any of them immediately, and you can even customize them to fit your needs.
Test the Page
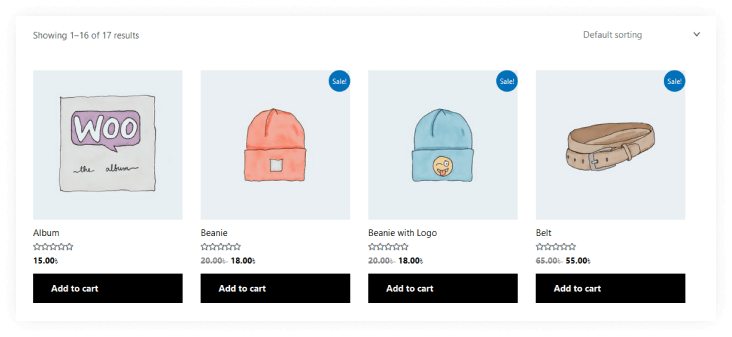
Finally, you should test the page to make sure it’s working properly and everything looks good on your end, as well.
Other Important Plugins for a WooCommerce Store
Some of the most important plugins for a WooCommerce store are here. These add features like product reviews, wholesale pricing, and more to give you greater control over your online business!
Contact Form 7:
If you desire to have a method on your website that customers can use to easily contact you, then the Contact Form 7 plugin is something you need for your WooCommerce store. With this plugin, you can create forms that fit your needs in order to collect customer feedback or any other required information. Its simple and easy-to-use interface lets anyone create customized forms with little effort.
The Extensions for CF7:
If your WordPress site uses the Contact Form 7 plugin, then the Contact Form 7 Extensions plugin is a must-have. This powerful plugin adds custom fields, file uploads, and much more to Contact Form 7. It also includes features that make it easier to manage contact forms such as exporting/importing forms and creating custom templates.
Whols
Whols is an excellent WooCommerce plugin for setting wholesale prices. It’s useful if you want to build an online store with wholesale capabilities. You may set different rates for various items and product categories, as well as minimum order quantities. Whols is a fantastic method to increase sales by offering wholesale clients discounts.
WP Plugin Manager
“WP Plugin Manager” is a WordPress plugin that lets you disable plugins for specific pages or posts. It’s possible that you don’t need to load all of the plugins on your website. WP Plugin Manager plugin allows you to deactivate individual WordPress plugins page by page in order to enhance site performance and reduce load times.
Wordfence
Wordfence protects WordPress with an end-point firewall and malware scanner that was created from the ground up to guard it. Wordfence’s Threat Defense Feed delivers the most recent firewall rules, malware signatures, and harmful IP addresses necessary to keep your website safe. Wordfence is complete with 2FA and a collection of extras.
RankMath
With Rank Math, you can easily optimize your content for search engines with built-in suggestions based on widely-accepted best practices. You can easily customize important SEO settings, control which pages are indexable, and determine how you want your website to appear in search results using this plugin.
W3 Total Cache
W3 Total Cache enhances your site’s SEO, Core Web Vitals, and user experience as a whole by making your website faster and reducing loading times. This is done by using features such as content delivery network (CDN) integration and following the latest best practices.
Frequently Asked Questions
Q1. What is WooCommerce?
WooCommerce is a plugin that turns your WordPress website into an online store. It allows you to sell products and services online and includes features such as inventory management, order processing, and payments.
Q2. What is Elementor?
Elementor is a drag-and-drop page builder plugin that makes it easy to create custom pages and posts for your WooCommerce store. With Elementor, you can add, delete, and rearrange elements on your pages without having to write any code.
Q3. How do I set up WooCommerce?
To set up WooCommerce, you first need to install the WooCommerce plugin on your WordPress site. Once the plugin is installed, you can activate it and begin setting up your store.
Q4. What is the process for creating a website using Elementor?
It’s simple to get started with Elementor. It may be installed in the same way as any other WordPress plugin. Once installed, you can activate it and begin creating custom pages and posts for your WooCommerce store.
Q5. How do I integrate WooCommerce with Elementor?
To integrate WooCommerce with Elementor, you need to install and activate the WooCommerce Elementor plugin. Once activated, you can start creating custom WooCommerce pages and posts with Elementor.
Q6. Is there a cost to using WooCommerce?
No, WooCommerce is a free plugin. However, you will need to pay for hosting, a domain name, and other necessary costs associated with setting up an online store.
Q7. How much does Elementor cost?
No, Elementor is a free plugin. However, you may choose to purchase premium templates or add-ons from their website.
Q8. Which is better: WooCommerce or Elementor?
Both WooCommerce and Elementor are great plugins with their own unique features and benefits. It all depends on your requirements.
Q9.What is WooLentor?
Woolentor is a WordPress plugin that allows you to create custom WooCommerce products using Elementor’s drag-and-drop builder.
Q10.How does WooLentor work?
Once installed and activated, you’ll be able to add a new “WooCommerce product” template to your Elementor library. This will give you access to all of the WooCommerce product fields, as well as some custom fields unique to Woolentor.
Q11.Do I need to know how to code to use WooLentor?
No! Woolentor is a drag-and-drop builder, so you don’t need any coding knowledge to use it.
Q12.Is WooLentor free?
Yes, Woolentor is a free WordPress plugin. If you want additional premium and advanced features, however, you may purchase their Pro version in different pricing packages.
Final Thoughts
WooCommerce is a popular customizable, open-source eCommerce platform built on WordPress that allows you to turn your WordPress site into an eCommerce store. WooCommerce gives you all the features you need to run an online store, such as product management, order tracking, payment processing, shipping, and tax calculations.
Elementor is a visual page builder that makes it easy to create beautiful pages and posts without any coding knowledge. Elementor lets you create stunning pages and posts with a drag-and-drop interface.
Together, WooCommerce and Elementor make it easy to build a professional-looking online store without any technical expertise. With both WooCommerce and Elementor, you can build an online store that looks great and is easy to use. WooCommerce and Elementor are both free, so you can get started without spending any money!