Have you ever changed your house or flat? It was a nightmare, right? Anyone who haven’t faced this local armageddon can imagine it. Packing all the packages, boxes, bags, numbering them, move, unwrap everything and then reorganize in the new home. You have to remember not only the packages but also where did you put it and an exact number of all that stuff.
It’s very easy to forget the essential things in such a chaotic situation. Similarly, migrate WordPress site to new host might give you nightmares. Migrate WordPress site to new domain is like a task that you want to avoid at all costs.
But what if I tell you that migrating a WordPress website is not that difficult? All the thanks go to some helpful plugins that allow you to migrate WordPress site to new domain very easily. In this post, I have shown you “how to migrate a WordPress site” with and without plugins.
After reading this post you don’t need to search with such terms as “how to migrate WordPress site to new domain or how to backup a WordPress site”. It is a complete step by step guide so you won’t have any problem to migrate WordPress site to new domain.
Before learning “how to migrate a WordPress site using WordPress migrate plugin”, first let’s know the importance and benefits of it.
- Why It’s Important to Migrate WordPress Site?
- Transfer WordPress Website using Plugins
- Benefits of Using Plugins
- Transfer WordPress Website Without Plugins
- Bonus 01: How to Migrate From Blogger to WordPress (Using XML)
- Bonus 02: How to Migrate WooCommerce Shop From One WordPress Site to Another (Using Any Plugin)
- Bonus 03: How to Migrate From Joomla to WordPress
- Final Words
Why It’s Important to Migrate WordPress Site?
If you ever feel the need to change your hosting then you have no other way then to migrate your WordPress website. There are many other reasons like –
- If you are removing the limitation of your hosting.
- If your site size got bigger then the subscription.
- Boost the production mode of the site.
- To redesign the site.
- To upgrade from free hosting to paid hosting.
For any of the reasons mentioned above, you need to migrate WordPress site to new host.
Transfer WordPress Website using Plugins
You can migrate WordPress site to new host using WordPress migrate plugins or without WordPress migrate plugins. Manual migration takes more time and sometimes it can be handy. WordPress migrate plugins provides more facilities and quick migration. The choice is up to you.
Benefits of Using Plugins
If you don’t want any hassle, and quick migration then plugins are your only solution. With the help of plugins, you can even migrate WordPress to aws. Moreover, if you don’t know how to backup a WordPress site, you can use these WordPress backup plugins to take backup and restore at a later time.
WordPress backup and restore is made easy with WordPress backup plugins.
Now let’s check different WordPress migration plugins(also known as WordPress backup plugins) and the procedure to solve the problem “How to migrate WordPress site to new domain”.
All in One WP Migration Plugin
All in one WP Migration plugin is considered as the easiest plugin that lets you easily migrate WordPress site including media files, databases, plugins, and themes. You do not need any technical knowledge to use all in one wp migration plugin.
To migrate site –
- At first log in to the administration area of your site. (From which you have decided to move data.)
- Now navigate to “Plugins > Add New”.
- In the search box of the top right sidebar, search for “All in One WP Migration” and click on the “Install” Now button.
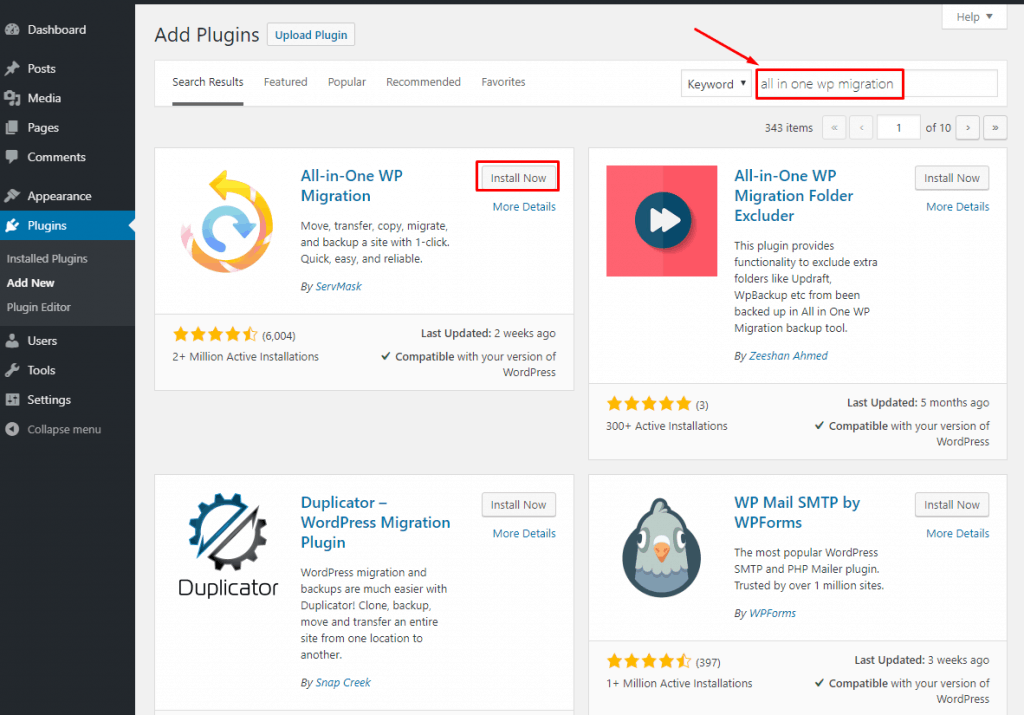
- After installing plugin don’t forget to activate it.
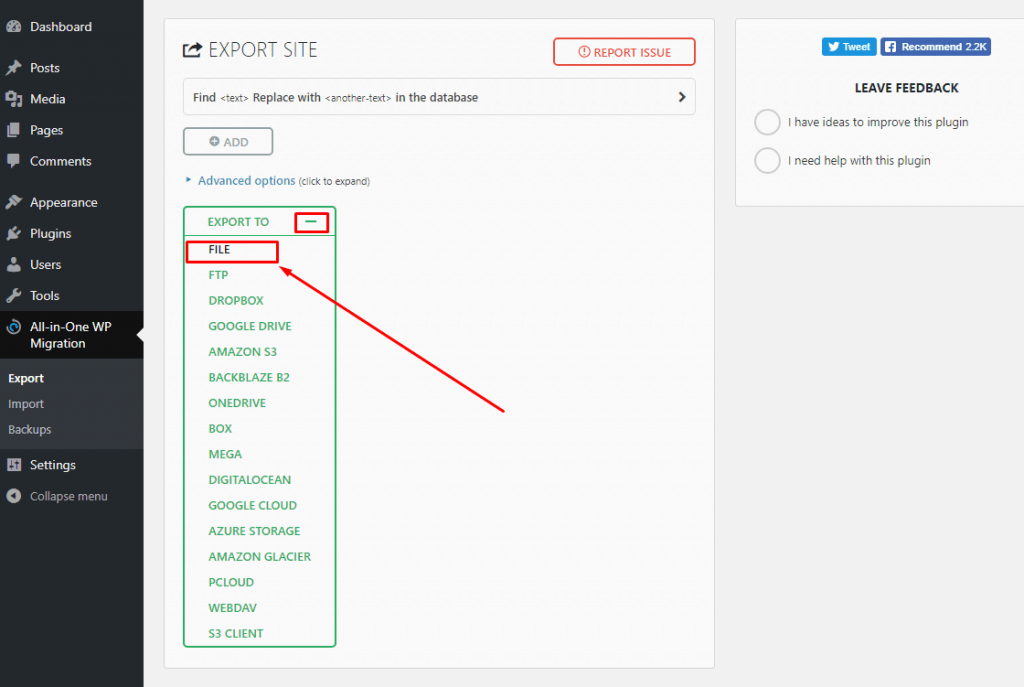
- Click on the “Export” button from “All in One WP Migration” situated at the left menubar.
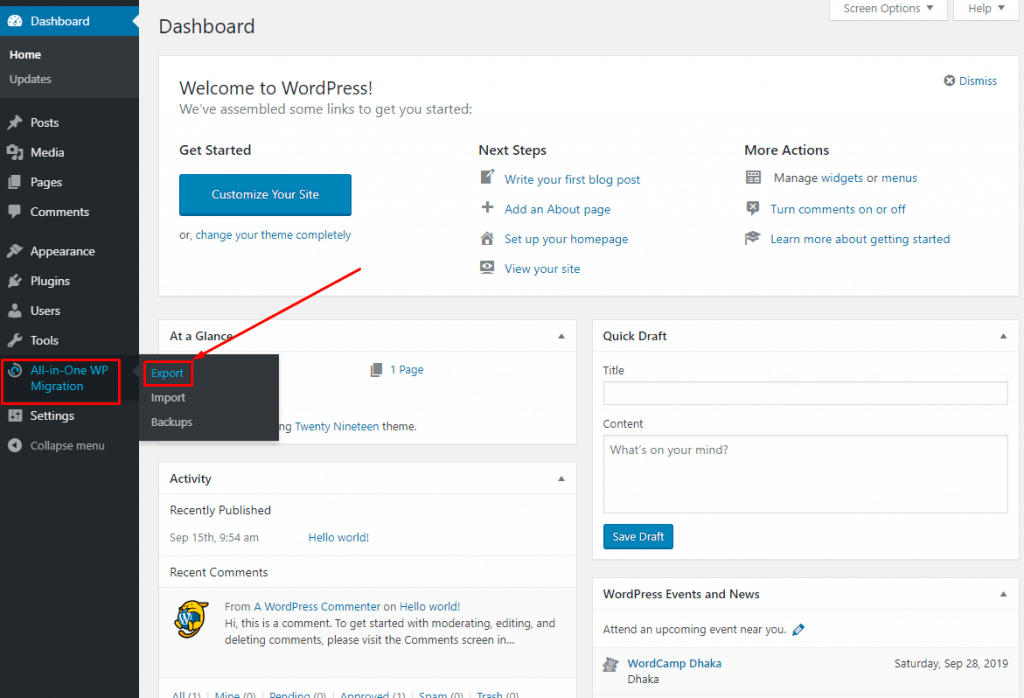
- Click “ Export To” and select “File”.
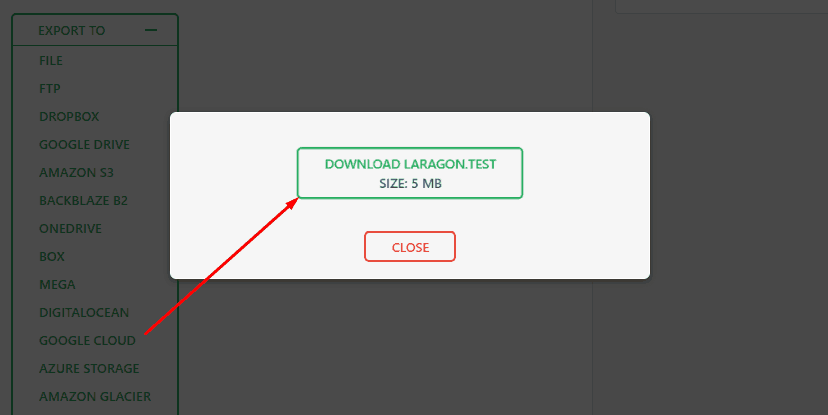
- Now the plugin will start taking a backup of your site. It will take a while depending on the size of your site. When the process is complete a pop up will appear. Just click the download button and save the backup file in a safe place. Then click the close button.
Now switch and login to your new host.
- Repeat steps 1-4 and make sure you have installed and activated the All in One WP Migration plugin.
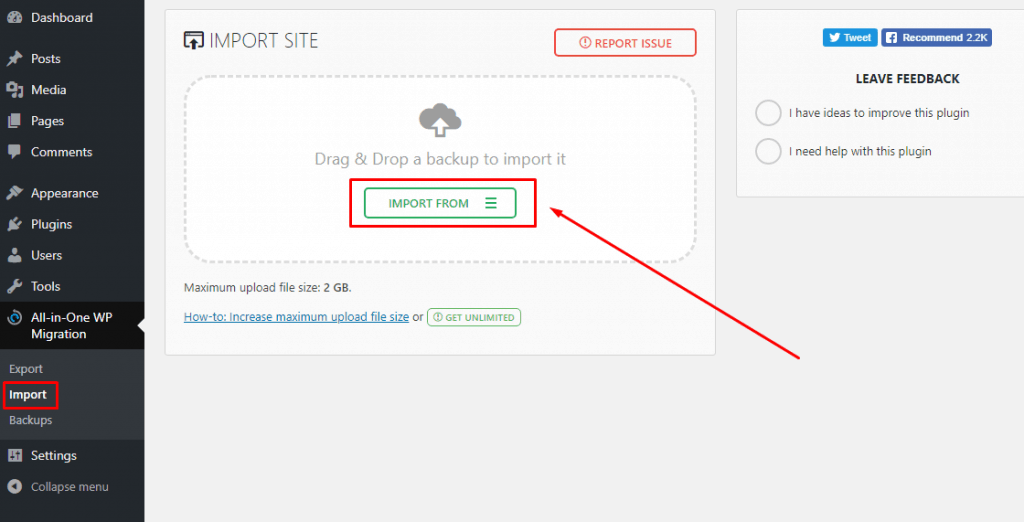
- Click on the “Import” button from “All in One WP Migration” situated at the left menubar.
If your maximum upload file size is limited, change it and make it 512MB.
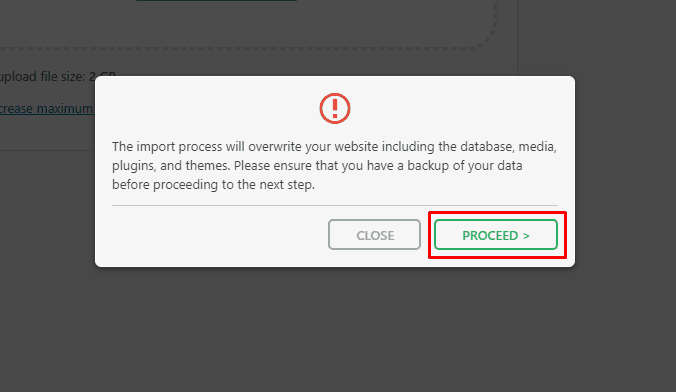
- Drag the downloaded file which is in .wpress format.
- The importing process will start and a popup will appear with a warning message of overwriting. Since this is a new install, you don’t need to worry. Click the Proceed button.
- After you receive the confirmation message that “Your site has been imported successfully!”, log out from the dashboard and then log in again. Don’t forget that you have imported data from your old site, which includes your old password.
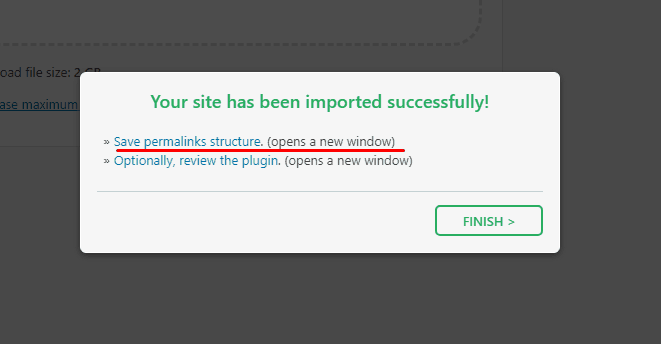
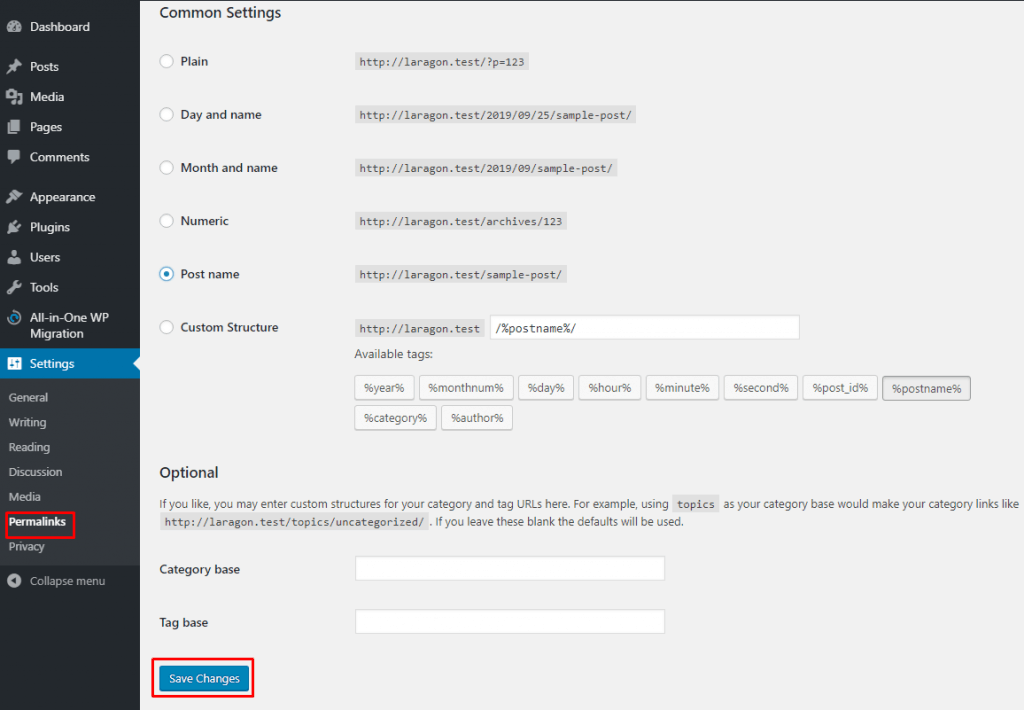
- From the left side menu, navigate to Settings > Permalinks and click on “Save Changes. It’s unnecessary to edit any of the default permalink structure information.
- You’re done migrating your site from one host to another host. Make sure everything looks correct.
If you still can’t figure it out check the video from the below.
Duplicator
Duplicator is one of the free migrator plugins that lets you migrate WordPress site without losing SEO. With the help of duplicator you will be able to duplicate your site within minutes. To migrate WordPress site using duplicator –
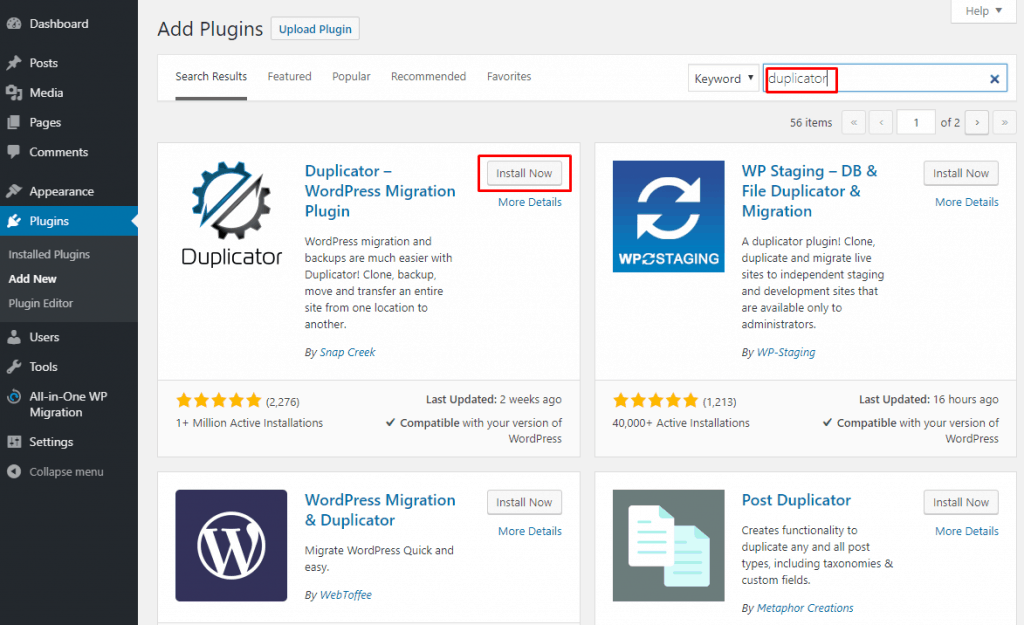
- First, install and activate the Duplicator plugin on WordPress site of which you want to take backup.
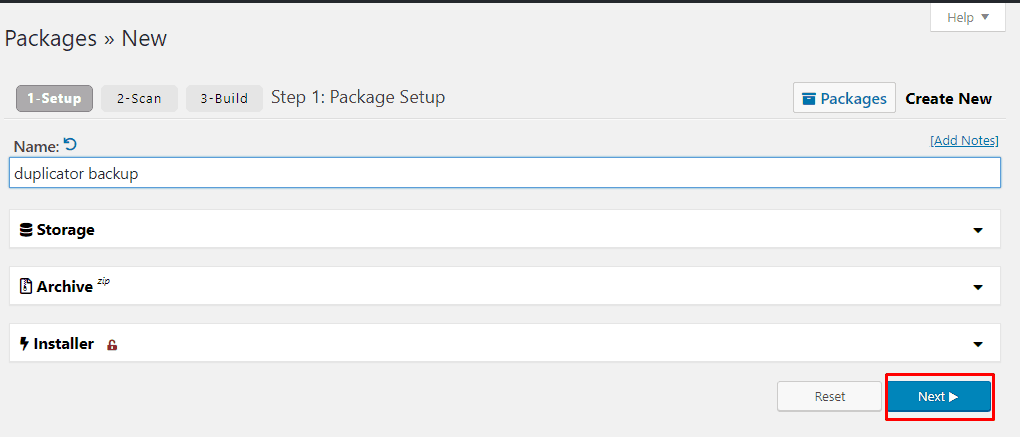
- Now from the left menu bar navigate to Duplicator > Packages, and click on the “Create New” button.
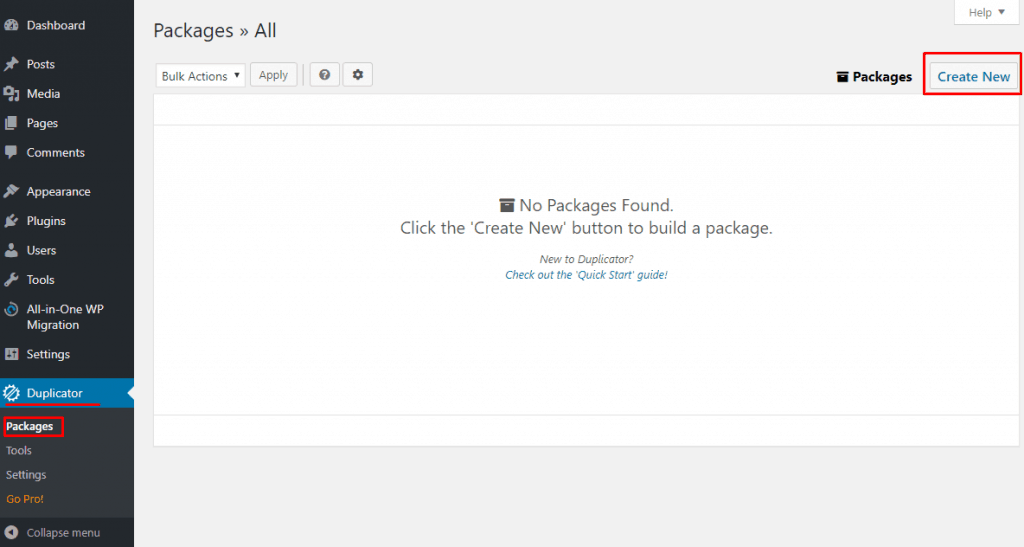
- After that choose a title for your backup name and click on the next button.
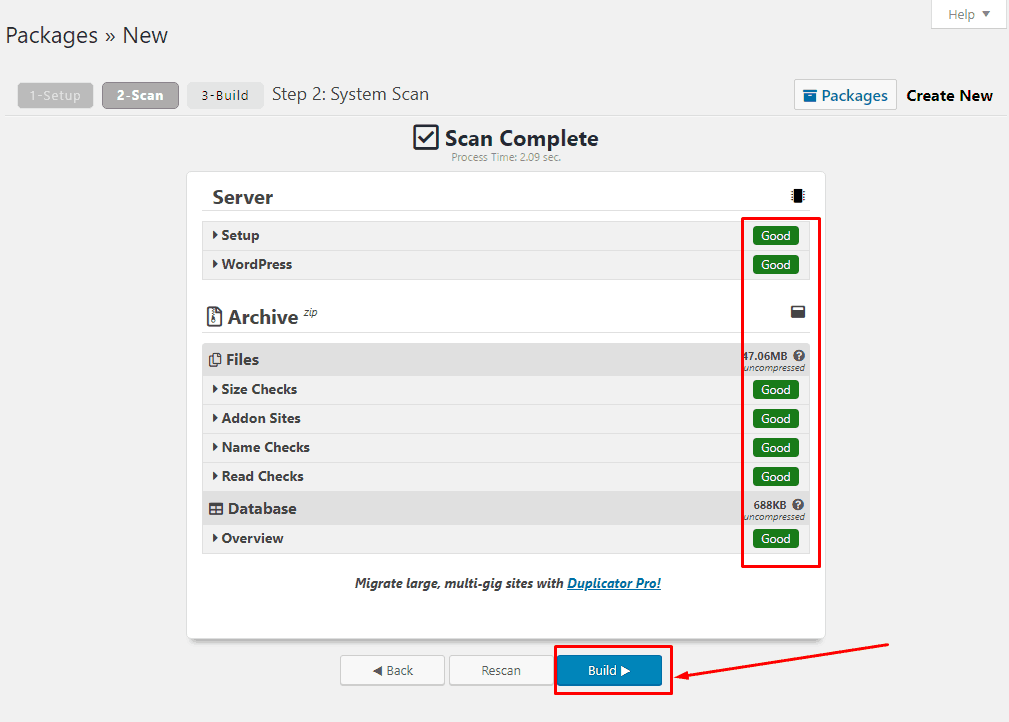
A scanning process will scan your website for the backup process. A few seconds later a popup will appear.
- Make sure your site result is good and everything is green. Then click the “Build” button.
This process might take several minutes to complete depending on the size of your website. Once the process is complete you will see the success message.
- Now click on “One-Click Download” button to download the backup file.
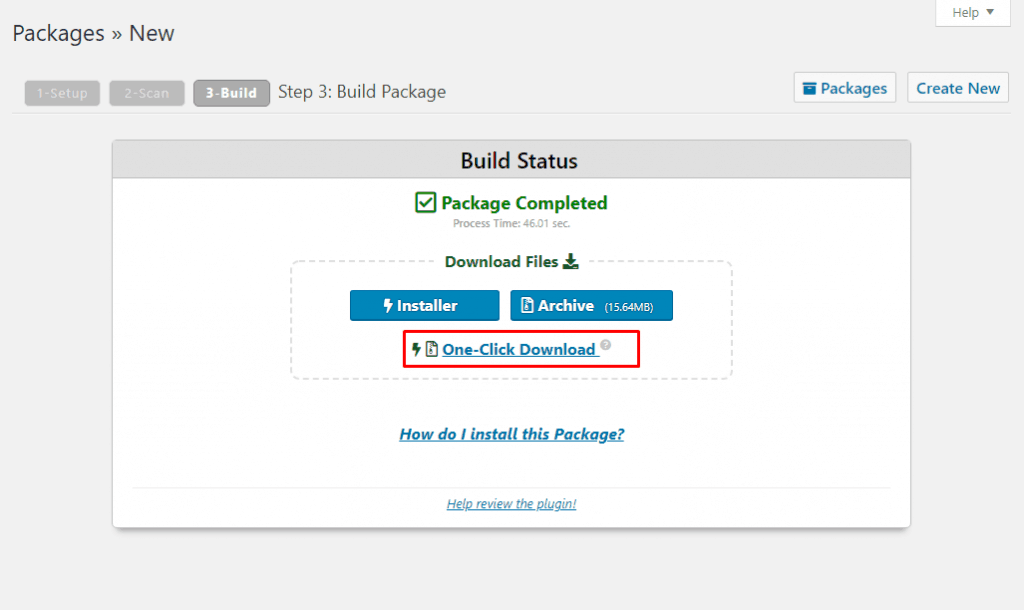
The archive file is the full backup copy of your site, you can restore this file anytime, in any website you want.
Now go to the Cpanel of your website in which you want to migrate your site.
- Login to Cpanel and from the files tab click on the “File manager”.

- Now navigate to the public html folder and create a new folder.
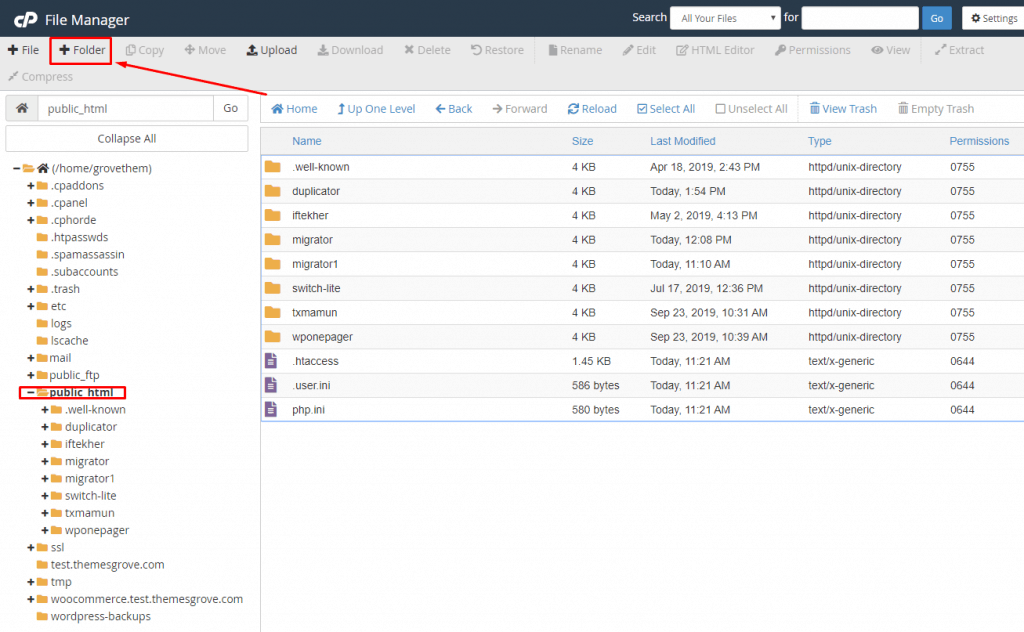
- Upload the backup file and installer.php in that folder.
- If you haven’t created any database yet create a new database from MySQL Databases.

We are ready to run the installer and complete the migration process.
- Navigate to http://www.your_domain_name.com/foldername/installer.php (replace your domain name with “your_domain_name” and “folder name” with the folder you created).
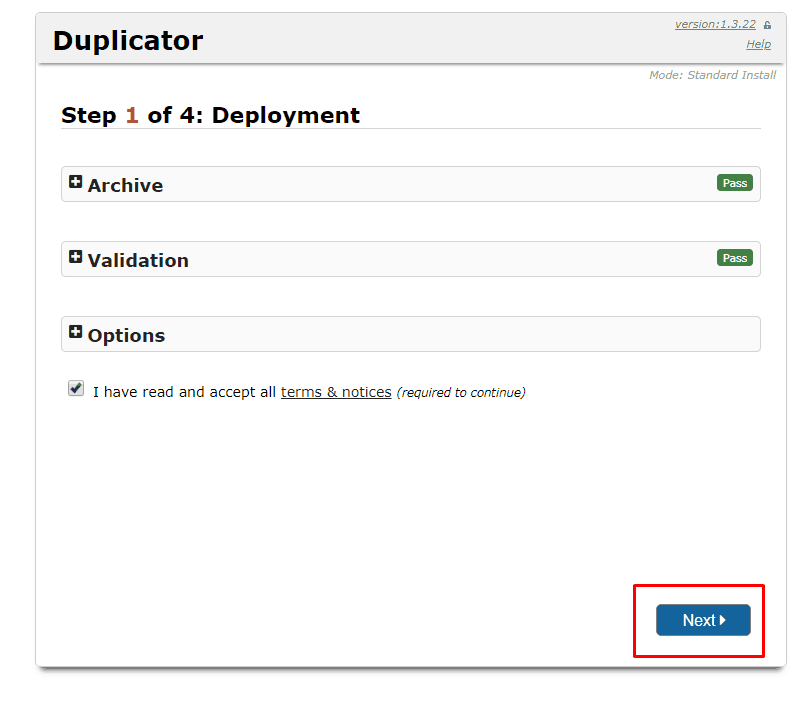
Now the installer will run a few basic tests and show you “Pass” next to archive and validation tests.
- Now click on the Next button. You will be asked to enter your hostname, database name, username, and password.
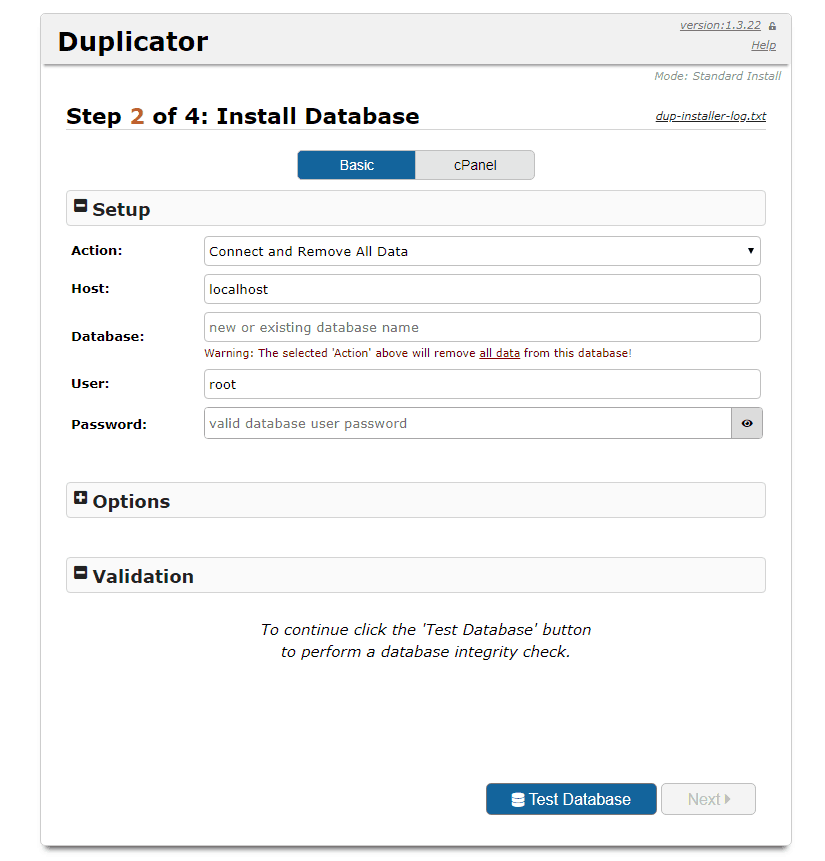
Now before going to the next step to test the database. So that you can be sure that the connection is successful. If the Duplicator is able to connect with the database, you will see a string starting with “Pass”.
- Then click on “Next” button. A popup window will appear with settings confirmation. Click “OK”.
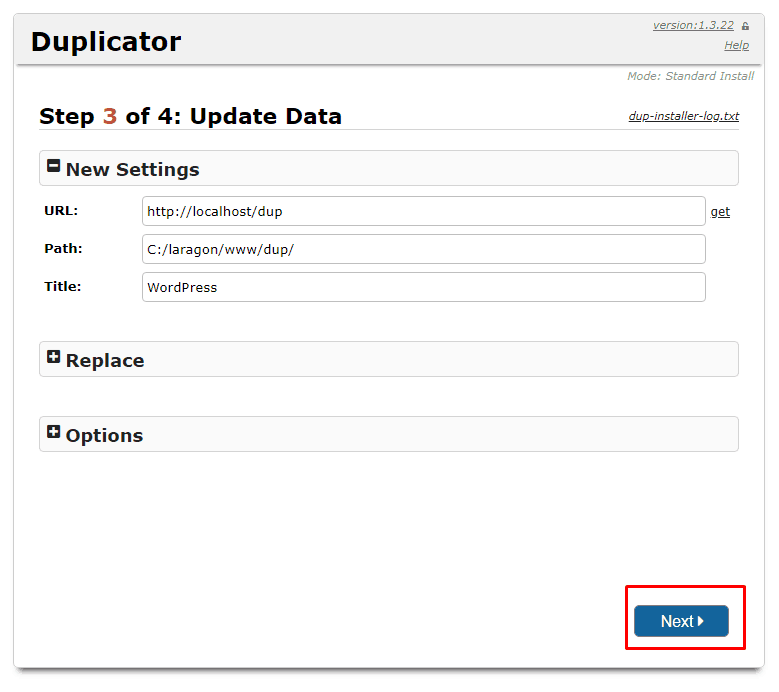
- Now the duplicator will ask you to update the Site path or URL. Since you are migrating, you don’t need to change anything. Just click the Next button.
- Duplicator will now run the final step and then will show the Admin login button.
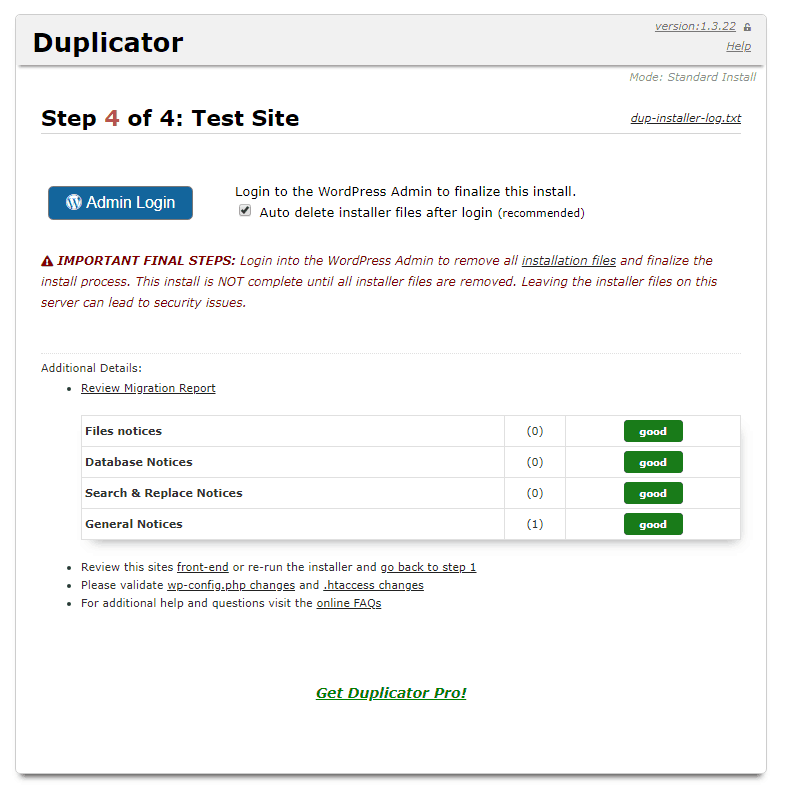
Now login to your site and make sure everything is migrated successfully as you expected.
Migrate Guru
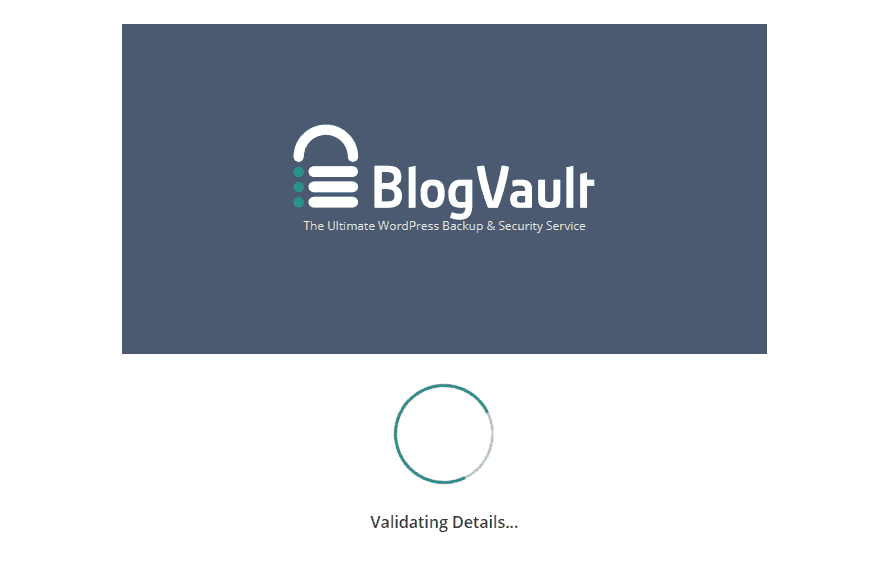
If you are thinking to migrate bigger sites then migrate guru is the fastest way to do it. It is powered by BlogVault and supports a various range of hosts including cPanel.
- To get started with migrate guru, install it from the WordPress repository and make it active.
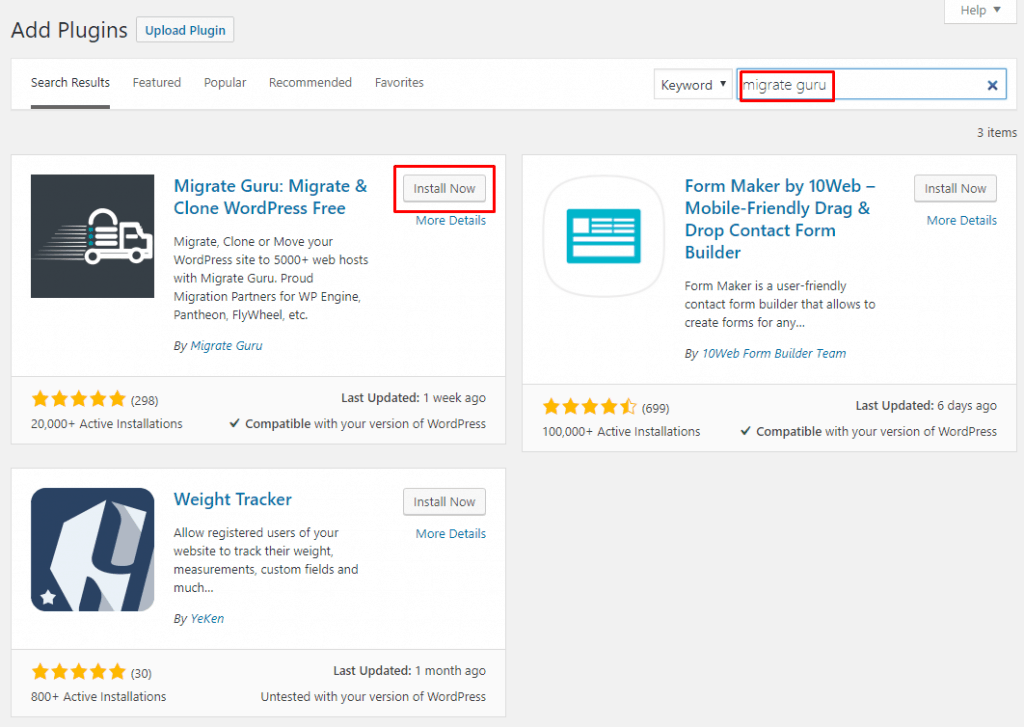
- From the left menu bar click on Migrate Guru.
- Enter your mail address and agree with the terms and conditions.
- Now hit the “Migrate Site” button.
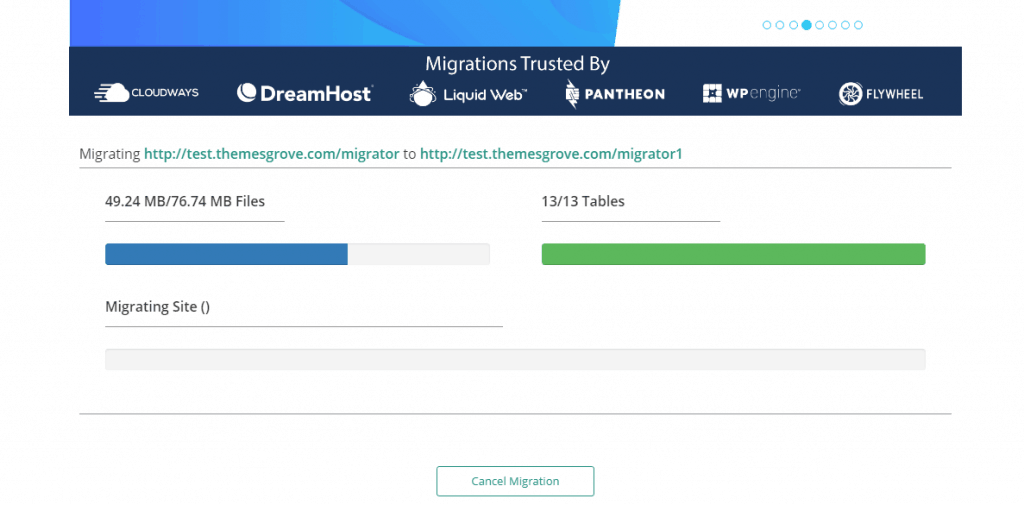
Migrate guru supports a various range of hosts. You just need to click on your host. The most common host is cPanel, therefore in this tutorial, I am migrating the cPanel website.
- Enter your destination sites credential like destination URL, cPanel username, password destination server ip address.
- After giving all the required credentials click on the “Migrate” button.
- Now the validation process will start and if your credentials are right, the migration process will start.
- Once the migration process is completed a success message will popup.
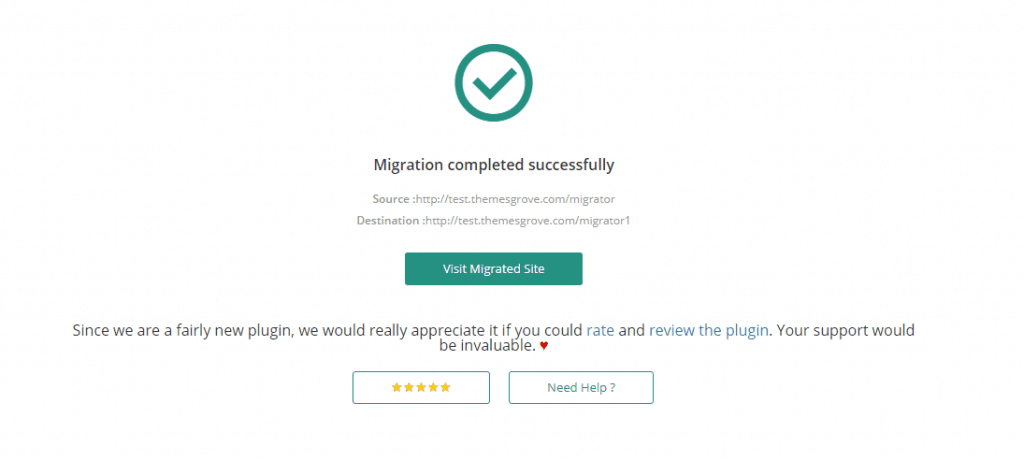
If anything is not clear to your check the video from below.
Backup Buddy
Backup Buddy is a premium plugin for migrating the WordPress website and there is no free version available. It backups all your files including media library themes, plugins and more. One backup process is completed you will be able to download and restore the site at any time you want to any host.
- Install the BackupBuddy in the default way.
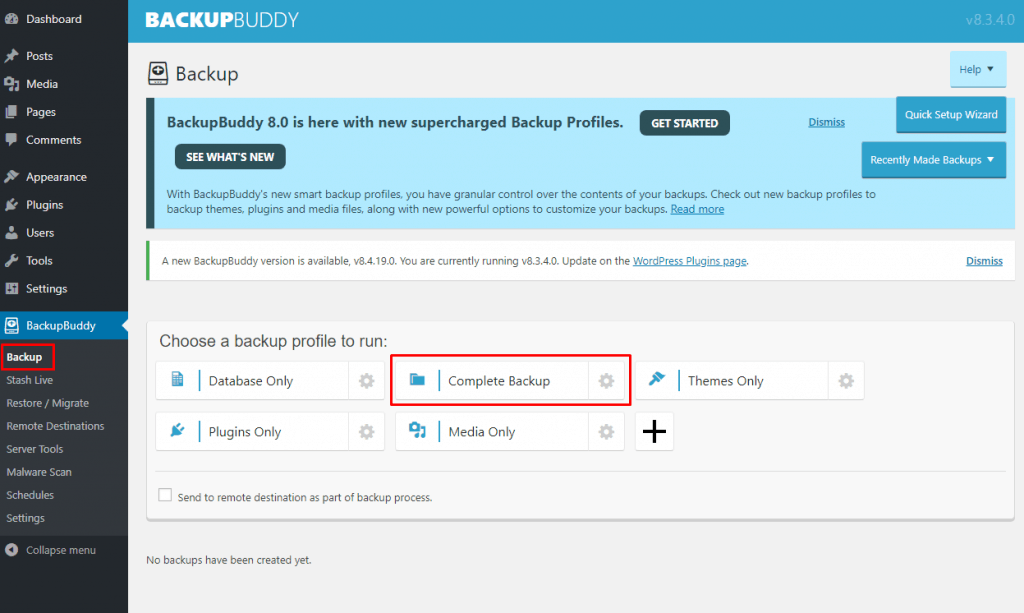
- From BackupBuddy on the left menu bar navigate to “Backup” and select “Complete Backup”.
The backup process will start and complete automatically. Wait a few moments untill a succes message arrives.
- Now click on “Download backup file” and save the file to any safe storage.
- Now from the left menubar navigate to “Restore / Migrate”. And download the “importbuddy.php”. Put your preferred password to start the download, remember this password will be used at later use.
The archive file is the full backup copy of your site, you can restore this file anytime, in any website you want.
Now go to the cpanel of your website in which you want to migrate your site.
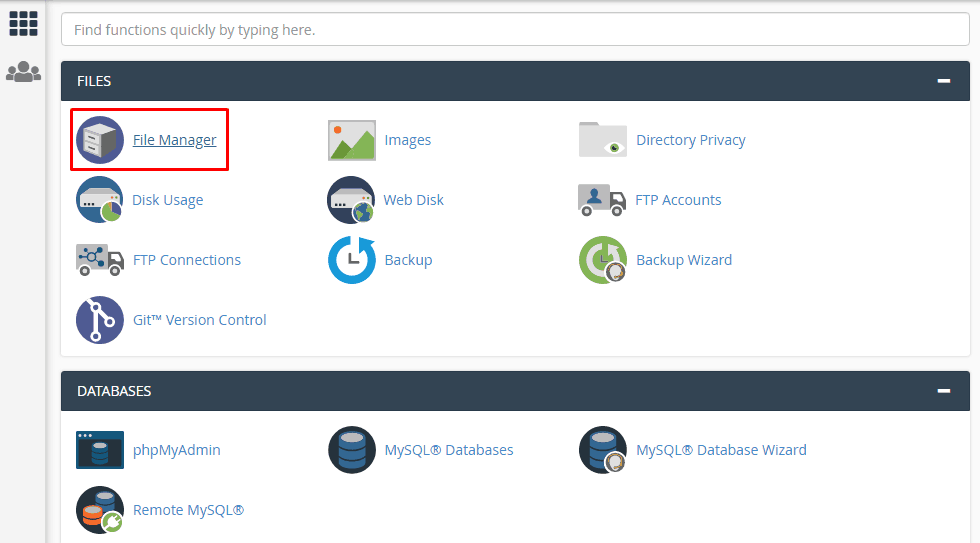
- Login to cpanel and from the files tab click on the “File manager”.
- Now navigate to the public html folder and create a new folder.

- Upload the backup file and importbuddy.php in that folder.
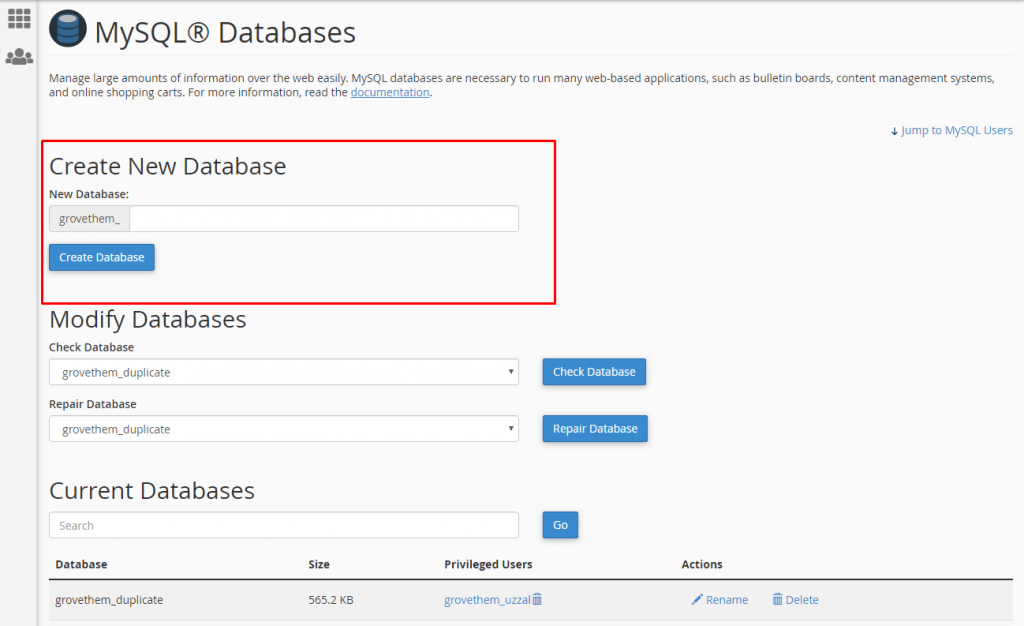
- If you haven’t created any database yet create a new database from MySQL Databases.
We are ready to run the installer and complete the migration process.
- Navigate to http://www.your_domain_name.com/foldername/installer.php (replace your domain name with “your_domain_name” and “folder name” with the folder you created).
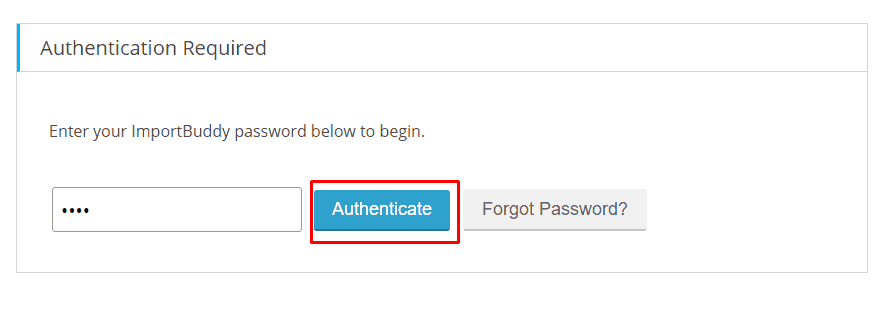
- Now before you move forward it will ask for the authentication password that you used before. Put the password in the box and click Authenticate.
- Click on “Restore Backup”. After a while database configuration page will appear.
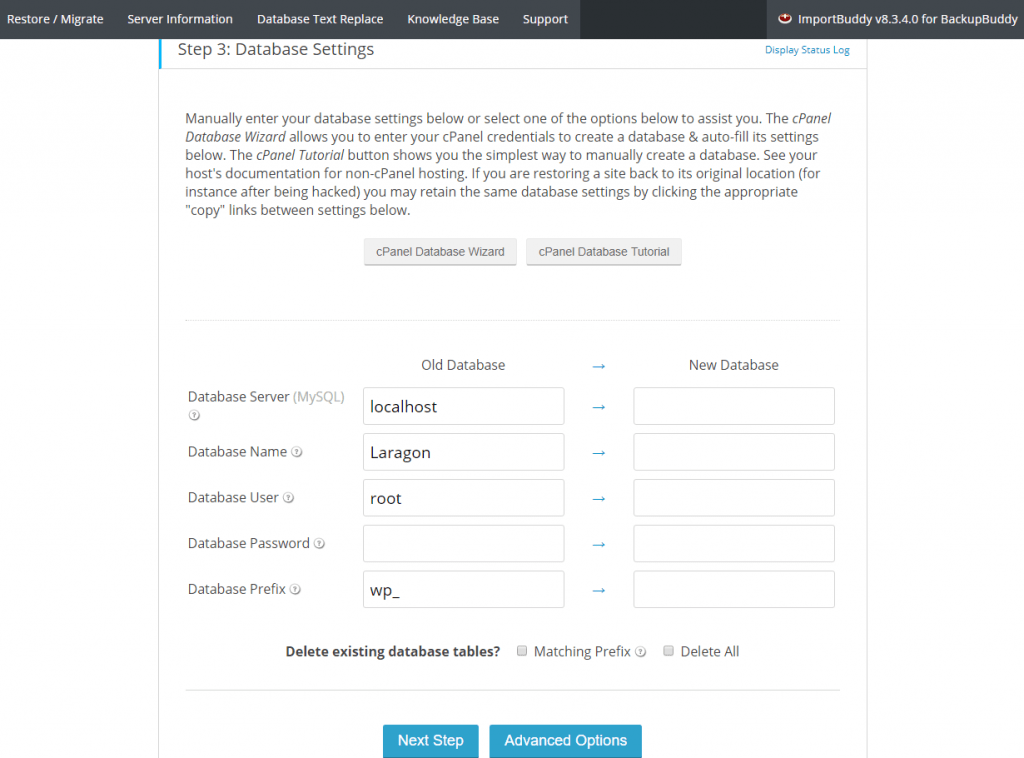
- Place your database information and click on “Next Step”.
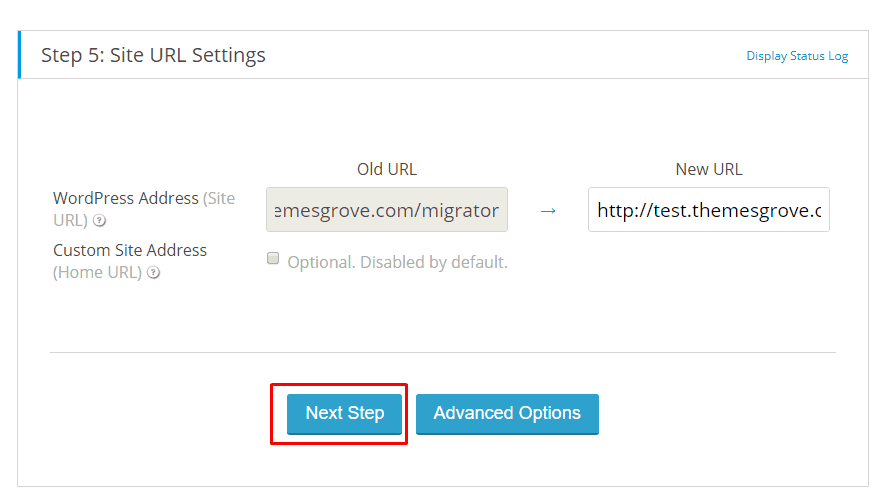
- Now place your new URL address and click on “Next Step”.
- Click the Finish Cleanup
Your migration process is done.
Transfer WordPress Website Without Plugins
Some people who don’t like to use any plugins can migrate their WordPress site manually. This will not put any load to your site and you don’t have to invest any money. Manual migration works best when any plugin fails or your website size is bigger than the average websites.
To migrate your website without any plugins,
At first, you have to backup your site and to do this ->
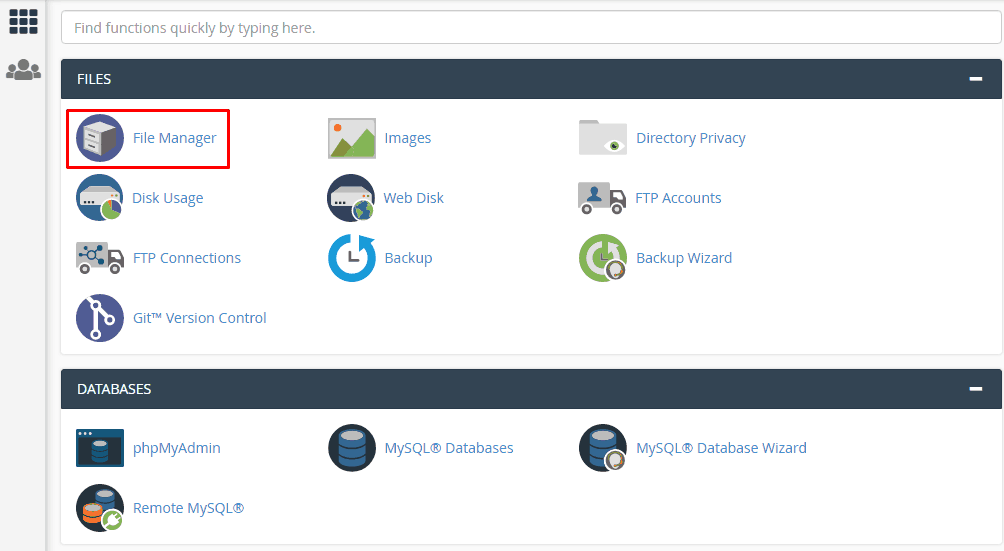
- First login to cPanel of your site and go to “File Manager”.
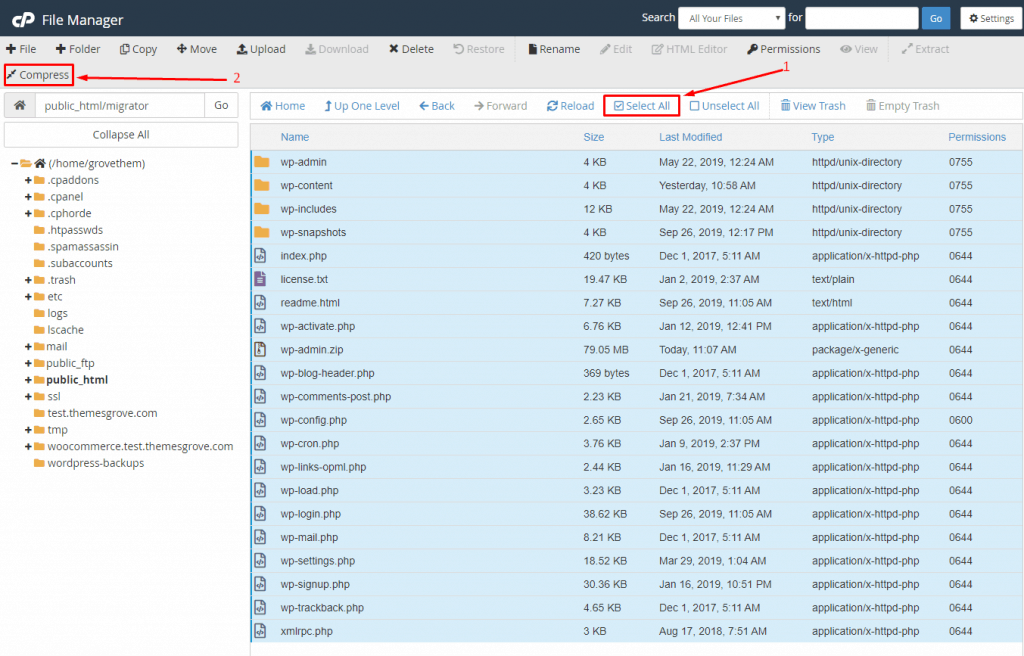
- Now navigate to publlic_html > your_site
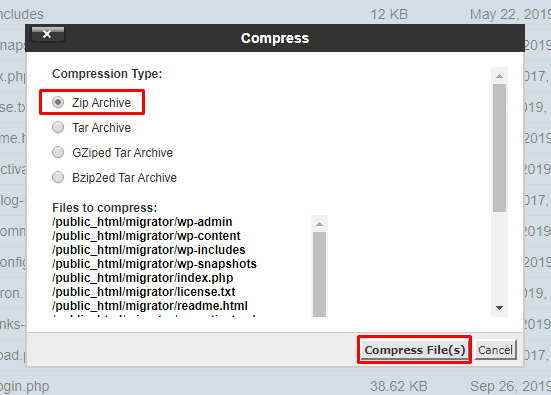
- Select all files of the folder and click on the “Compress” button.
- Choose the zip archive and compress the files.
- Now reload the page and download the “wp-admin.zip” folder.
- Go back to the cPanel, select phpMyAdmin and click on “Export”.
- Choose “Custom” as the export method, then select your database and scroll below to hit the go button.
It’s time to restore this site in the new host.
- Login to the cPanel of the new site.
- Click on file manager and navigate to “public_html” and create a folder with your new site’s name.

- Now upload the “wp-admin.zip” in that folder and then delete the zip file.
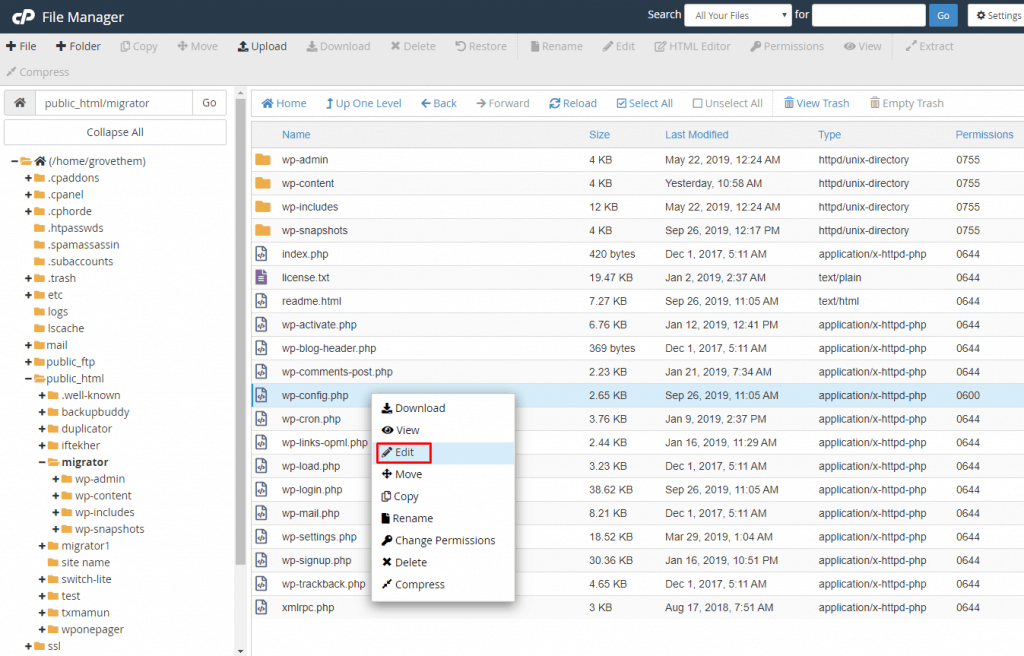
It’s time to edit the wp-config.php file.
- Right click and edit wp-config.php.
- Locate the following line :
define(‘DB_NAME’, ‘db_name’);
In the “db_name” potion define your MySQL database name of your old web host.
- Now locate line:
define(‘DB_USER’, ‘db_user’);
In this potion define your database username.
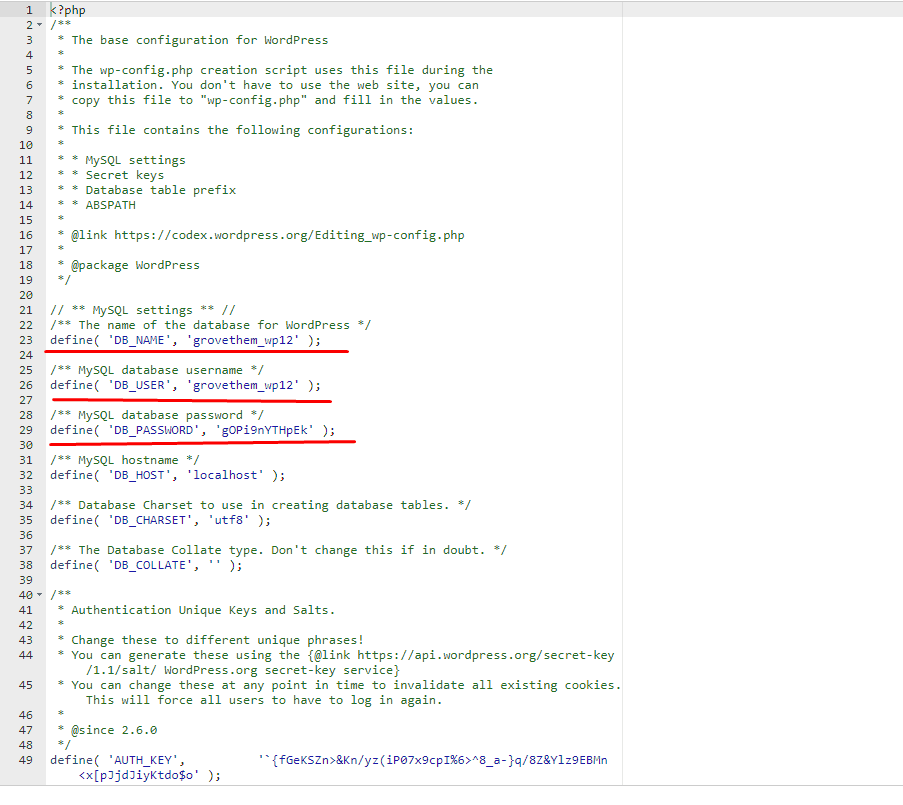
- Finally, locate
define(‘DB_PASSWORD’, ‘db_pass’);
Then replace the password for database with “db_pass”
Now let’s restore the database.
- Return to cPanel and click on “phpMyadmin”.
- Click on the “Import” button and choose the downloaded “.sql.zip” file.
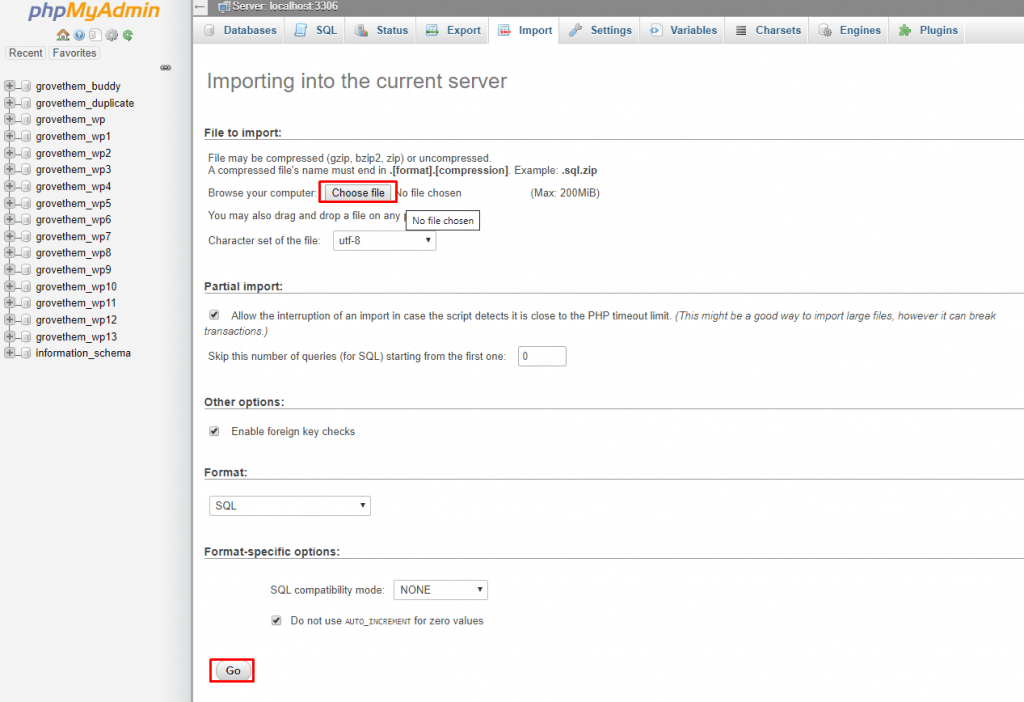
- Hit the “Go” button below and your database will be uploaded.
Bonus 01: How to Migrate From Blogger to WordPress (Using XML)
Suppose you have a blogging site but now you want to move to WordPress CMS, what you will do? Is it even possible?
You don’t need to go elsewhere and search to move your blogging site to WordPress. You can easily do it by following the steps below.
To migrate from blogger to wordPress
- First login to your blogger site.
- Now navigate to Settings > Other and click on the “Back up Content”.
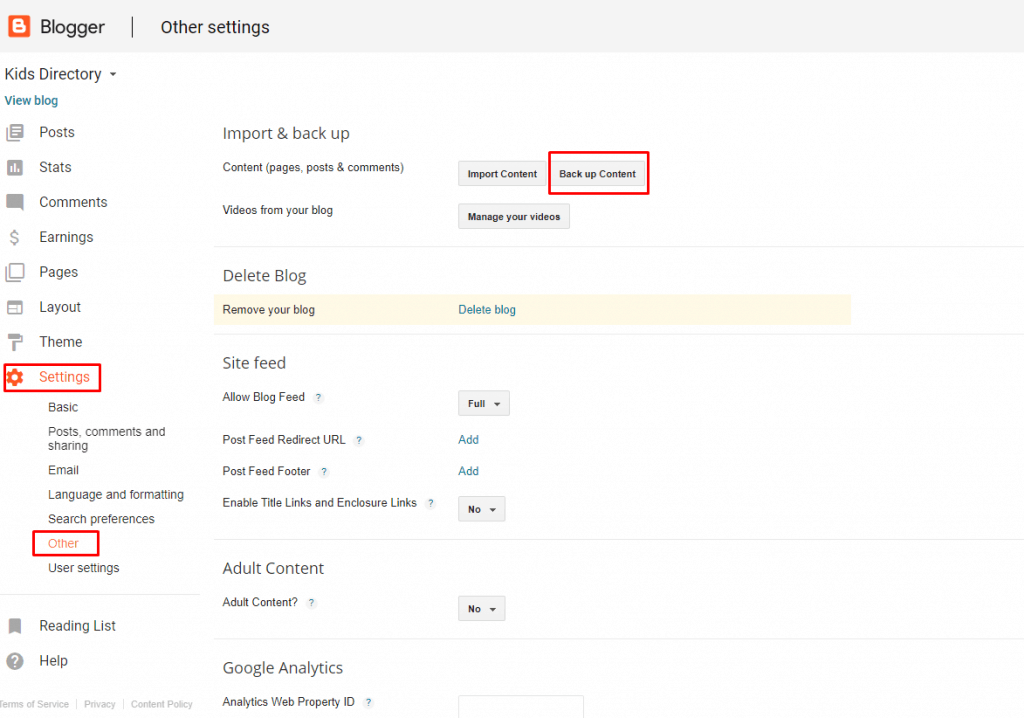
- A pop up will appear, click on “Save to your computer”.
- A blog.xml file will be downloaded.
Now return to your WordPress site
- Go to Tools -> Import and click on the Install button.
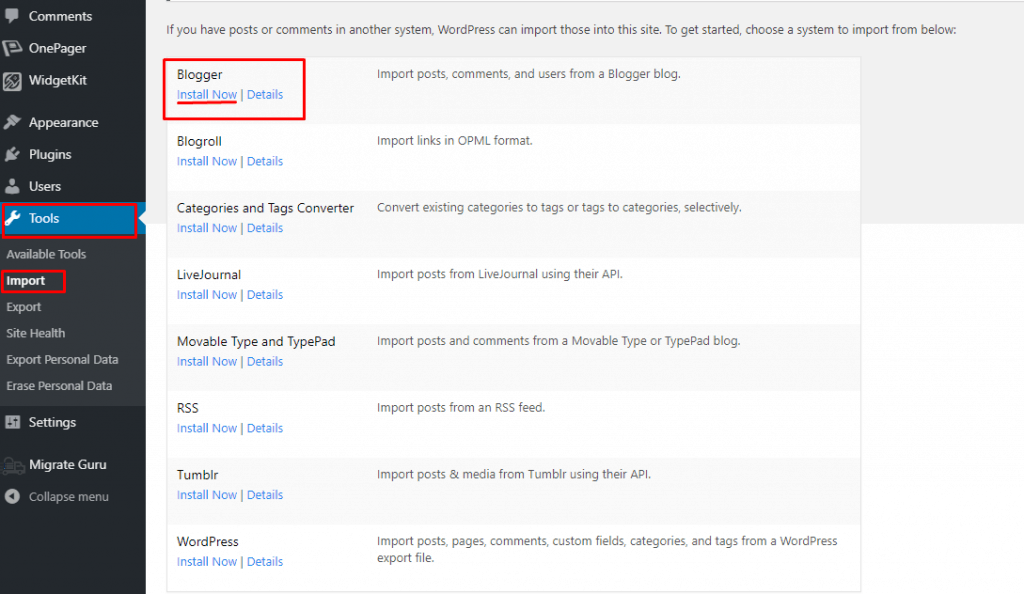
- Now click on “run importer” and choose the downloaded blog.xml file.

- Hit the “Upload file and import” button.
Depending on your blog size, this might take a few moments.
Bonus 02: How to Migrate WooCommerce Shop From One WordPress Site to Another (Using Any Plugin)
For migrating your woocommerce store you don’t need to use any hanky panky plugins. You can do this easily All in One WP Migration or Duplicator. Just follow the steps that are mentioned above and your WooCommerce site will be migrated instantly.
Bonus 03: How to Migrate From Joomla to WordPress
The headline might amaze you, but it’s possible to migrate from Joomla to WordPress. I am not kidding, just follow the step below.
Pro TIP: If you are using Quix Joomla Page builder in you Joomla website, at first you have to export all of your pages from Quix and then you may move on to the migration procedure.
To migrate from Joomla to WordPress,
- Open your Joomla site and navigate to System > Global Configuration > Server tab.
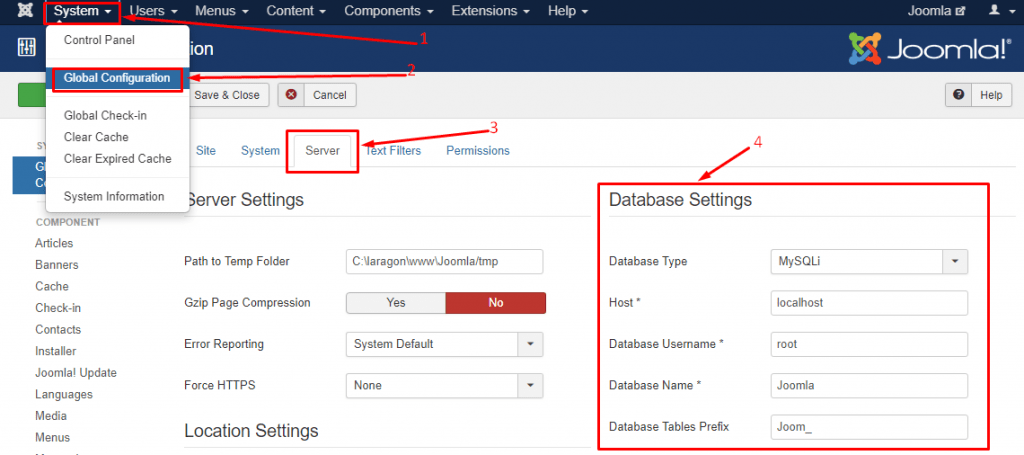
- Now take and keep the database information handy because you will need it.
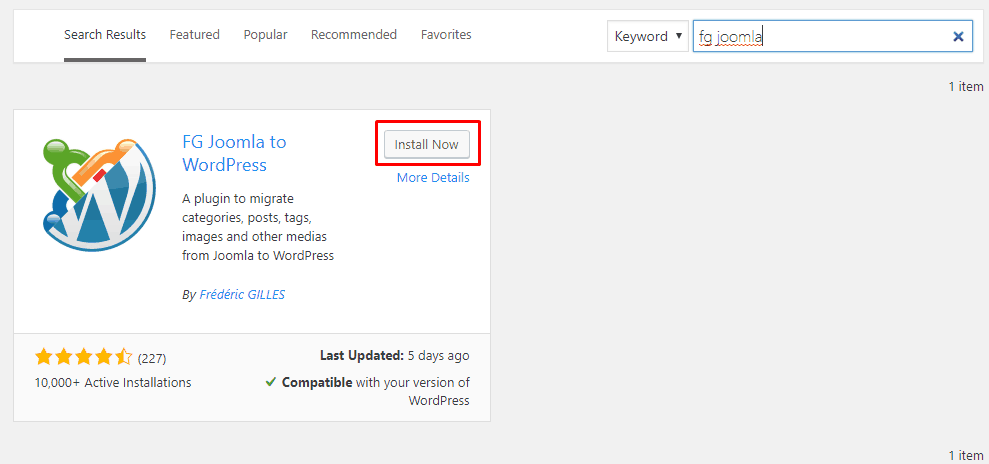
- Switch to your WordPress site and Install “FG Joomla to WordPress” plugin.
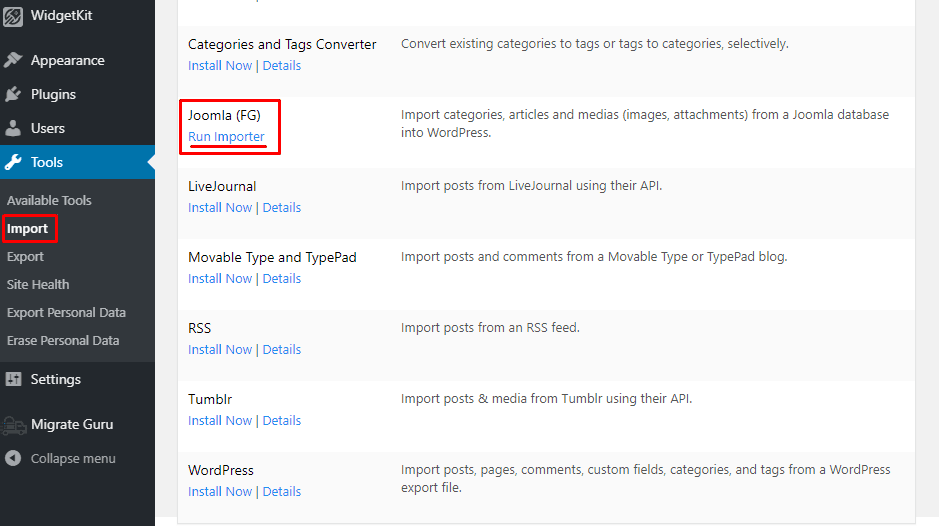
- Activate the plugin and navigate to Tools > Import. You will find a new import option “Joomla (FG)”, click on the Run Importer.
- Here you have two options. Select “Remove all WordPress content” and click “Empty WordPress content” button.
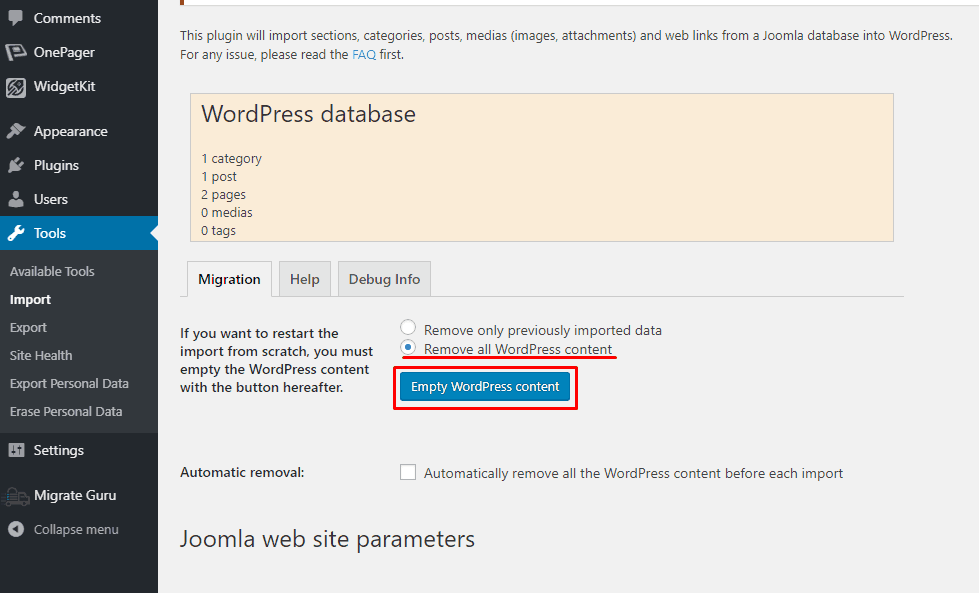
This might take a few moments. When the process is complete a pop up will appear from the above and the database section will reset to zero.
- Now move down to Joomla web site parameters section and put the URL of your live Joomla site.
- Fill the database settings that were saved earlier and hit the “Test the database connection” button.
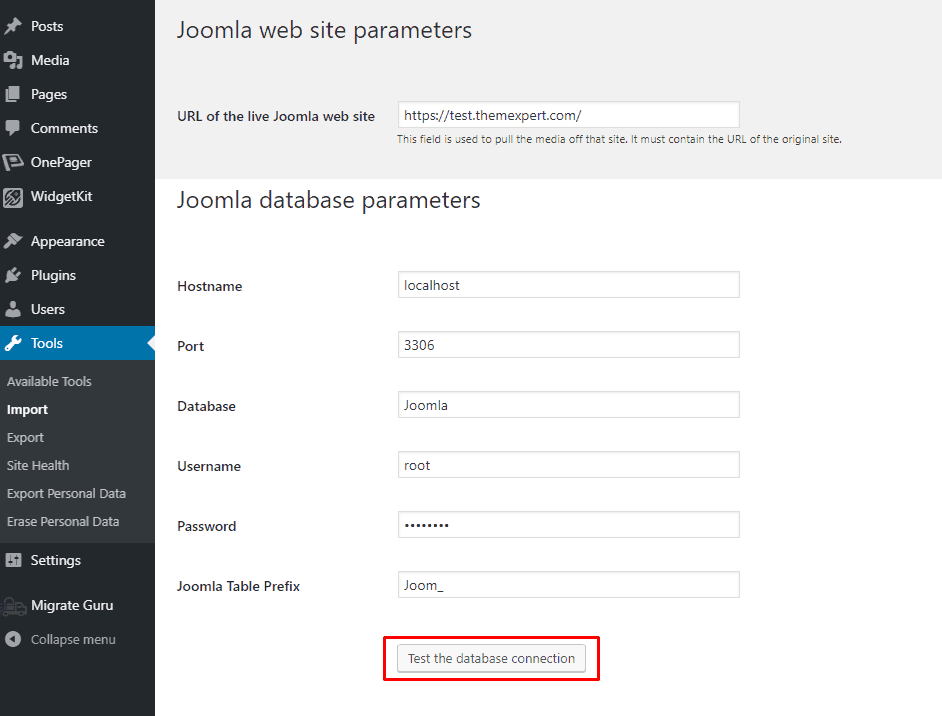
If the database connection is successful a message will appear.
- Now from the below section change the settings as you require or do it as the image below.

- Save the settings and hit “Start / Resume the import”.
- Sit back and relax for a while. When the process is complete a success message will appear.
- Now click on “Modify internal links”. This option will modify any internal links between your pages and posts to their new URLs.
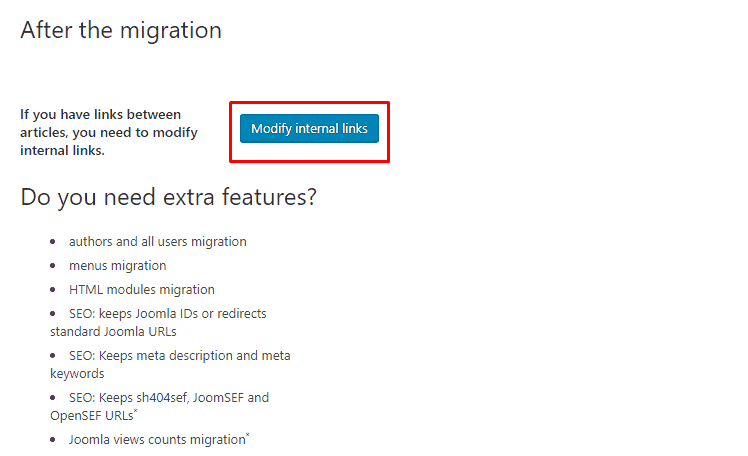
Your migration from Joomla to WordPress is complete.
Final Words
I hope now you don’t have a question like “how to migrate WordPress site to new domain”. Use any of these WordPress plugins and migrate your site easily. If you are still confused to choose one and ask for my suggestion, I will suggest you to use “All in One WP Migration” plugin.
If you face any problems let me know through the comment box.