At the beginning of my career I tried to install WordPress locally but failed terribly.
Wait seriously?
As you know that I’m a writer and my favorite platform is WordPress, therefore I planned to install and explore WordPress.
I searched the internet with the term ‘how to install WordPress on localhost’ and tried to install WordPress by following one of the guide. But I failed. I was getting an error message saying – ‘error establishing a database connection wordpress localhost xampp.There are tons of guides available on the internet, however most of them were hard for me to understand.
At last my colleague Md. Asasuzzaman Abir helped me with some tips and then I became successful installing WordPress on localhost. It was very easy and straightforward process.
Anyways, as I faced these issues while installing WordPress on localhost and now one of my new colleagues is facing the same issues. Therefore I thought to write a guideline for my readers so that from beginner to professional, everyone can easily install WordPress on localhost.
I have covered installation process for all platforms. I have also covered detailed comparison with pros and cons, so that you can choose a suitable application for yourself.
Let’s dig.
- Why It’s Important to Install WordPress on Localhost
- Top Applications For Installing WordPress on Localhost
- How to Install WordPress on Localhost using Local Environment
- XAMPP vs WAMP
- XAMPP vs MAMP
- MAMP vs WAMP
- XAMPP vs AMPPS
- AMPPS vs MAMP
- Uniform Server
- How to Install WordPress Using Uniform Server
- Pros of Uniform Server
- Cons of Uniform Server
- Local by Flywheel
- How to Install WordPress Using Local By FlyWheel
- Pros of Local by Flywheel
- Cons of Local by Flywheel
- Laragon
- How to Install WordPress Using Laragon
- Pros of Laragon
- Cons of Local by Laragon
- Which One to Use?
- Final Words
Why It’s Important to Install WordPress on Localhost
If you are new to development then its best to install wordpress in localhost first. Because you may get tangled with the problems with the hosting and cpanel in the first use. Besides localhost helps you create an entire site without any kind of trouble and you can test your application or web apps in the way you want.
Top Applications For Installing WordPress on Localhost
| Features | XAMPP | WAMP | MAMP | AMPPS | EasyPHP | Uniform Server | Local by Flywheel | Laragon |
| One click site installation | ❌ | ❌ | ❌ | ❌ | ❌ | ❌ | ✔️ | ✔️ |
| Cross-Platform | ✔️ | ❌ | ✔️ | ✔️ | ❌ | ❌ | ✔️ | ❌ |
| Can create any CMS site? | ✔️ | ✔️ | ✔️ | ✔️ | ✔️ | ✔️ | ❌ | ✔️ |
| Have to create database every time? | ✔️ | ✔️ | ✔️ | ✔️ | ✔️ | ✔️ | ❌ | ❌ |
| Beginner Friendly | ❌ | ❌ | ❌ | ❌ | ❌ | ❌ | ✔️ | ✔️ |
| Additional Extensions | ✔️ | ❌ | ❌ | ✔️ | ✔️ | ❌ | ✔️ | ❌ |
| Built-in Code Editor | ❌ | ❌ | ❌ | ❌ | ❌ | ❌ | ✔️ | ✔️ |
| Softcalus Integration | ✔️ | ✔️ | ✔️ | ✔️ | ✔️ | ❌ | ❌ | ❌ |
| Resource Hungry | ❌ | ❌ | ❌ | ✔️ | ❌ | ❌ | ✔️ | ❌ |
How to Install WordPress on Localhost using Local Environment
Installing WordPress locally is a very easy process, if you know how to do it. Else, it might become very difficult. The very first thing you have to choose is the right tools or localhost. There are a good number of free localhost servers are available, but choosing the wrong one might waste your valuable time.
And you might find many difficulties while installing one, therefore I am providing details with step by step process.
XAMPP
XAMPP is known as the most popular PHP development environment. It is completely free and very easy to install program. The package of XAMPP contains MariDB, Perl, Apache, and PHP and available for Windows, Linux and Mac OS X.
How to Install WordPress Using XAMPP
To install WordPress using XAMPP server –
- First, download it from the official location.
- Choose your preferred download option, e.g. If you are using windows then choose XAMPP for Windows.
- Install the XAMPP in the default way or choose the component as you required.
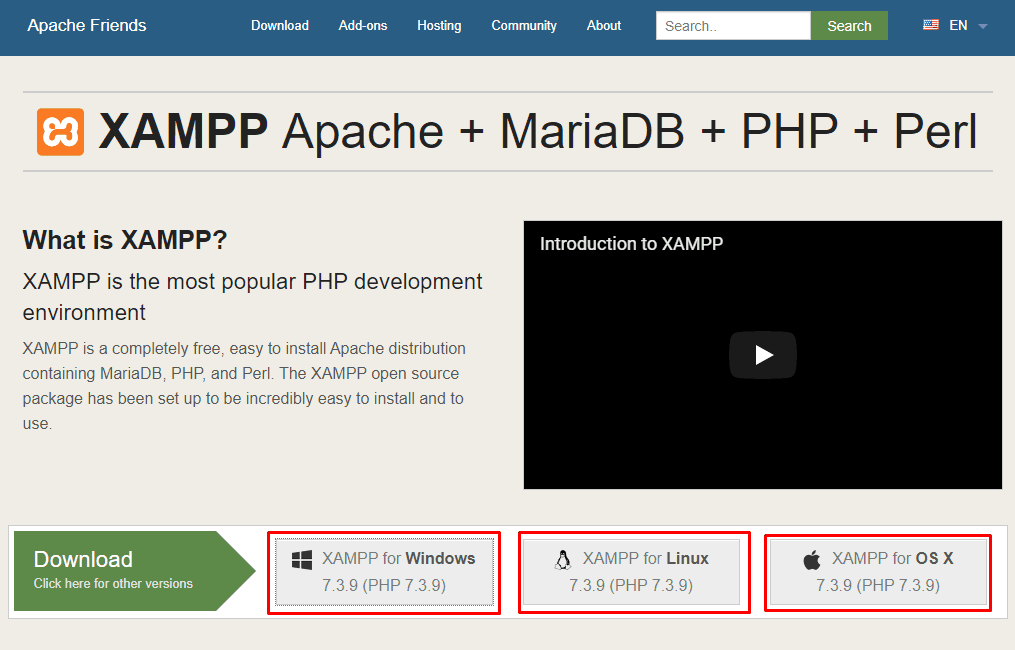
You have successfully installed XAMPP on your pc. Now the second part begins. Now it’s time to install WordPress. But before installing WordPress we have to create database.
- Run the XAMPP control panel.
- Now start ‘Apache’ and ‘MySQL’. (Apache is the webserver and MySQL keeps your database.)
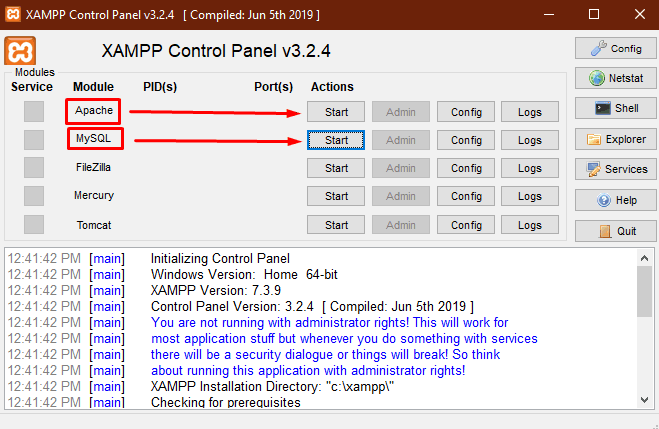
- Now open your browser and go to ‘localhost/phpmyadmin’.
It’s time to create a Database for your site.
- Click on the ‘new button’ from the top left corner.
- Put your database name and click on the ‘create’ button. (I have created a database named ‘xampp_site’.)
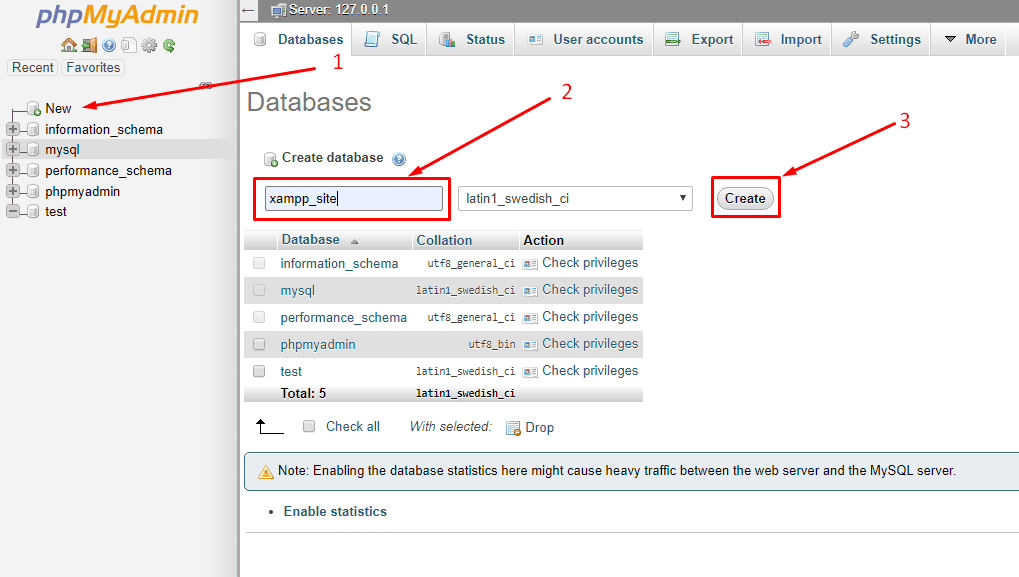
Database creation is done! Now let’s start installing WordPress.
- Download the WordPress from ‘wordpress.org’.
- Extract the zip file and rename to your preferred site name. (I have renamed it to xampp_site)
- Put the folder in your htdocs directory. The default location of htdocs directory is (C:\xampp\htdocs)
- From your browser go to ‘localhost/your_site_name’. (I am entering this address ‘localhost/xampp_site as my site name is xampp_site’.)
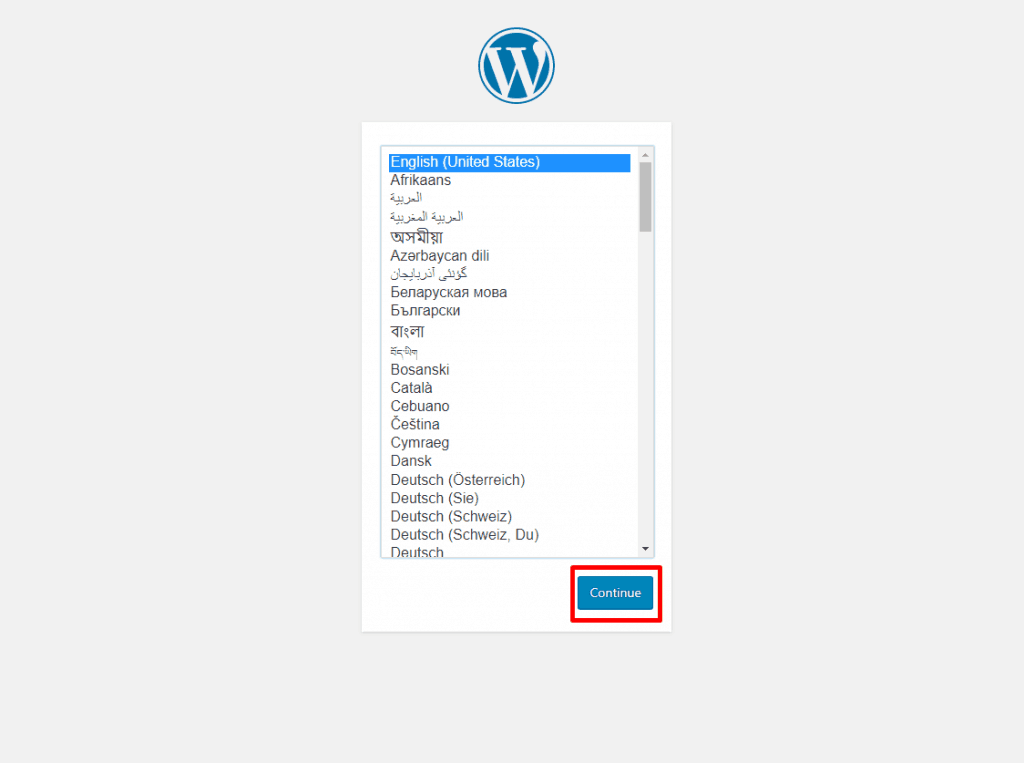
- Choose your language and click on the ‘Continue’ button.
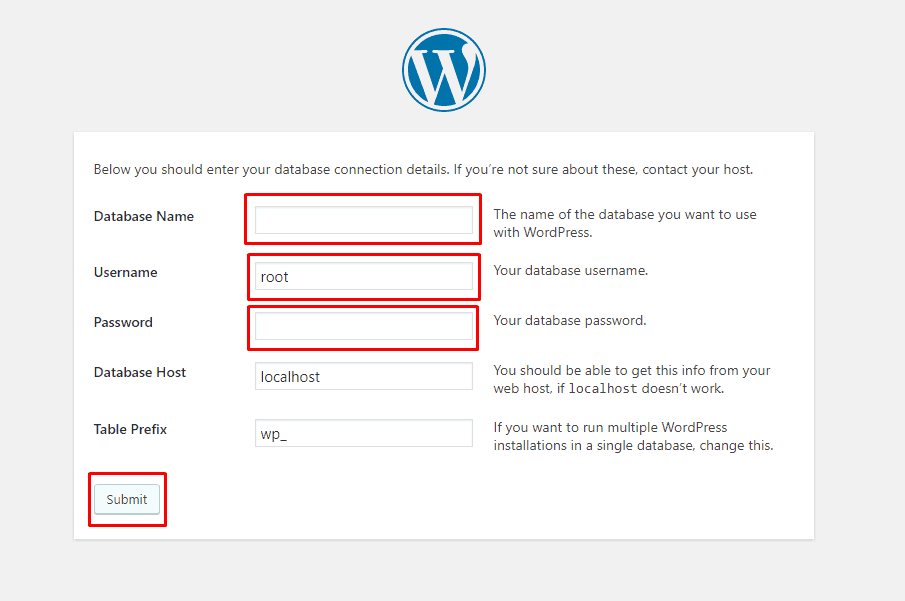
- Now put your database name, user name, and password to run the installation. (The default database username is ‘root’ and password is blank.)
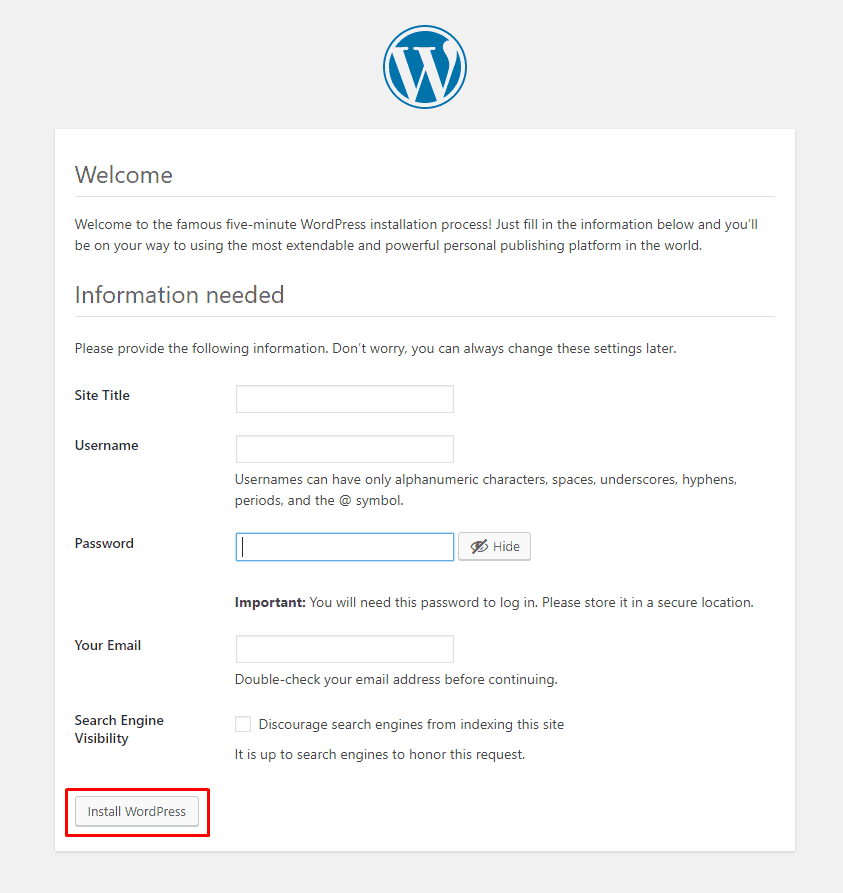
- Give your site details and hit the ‘Install WordPress’ button.
Congrats! You have successfully installed WordPress localhost with XAMPP. Now login to your site with the details you have used during installation of WordPress.
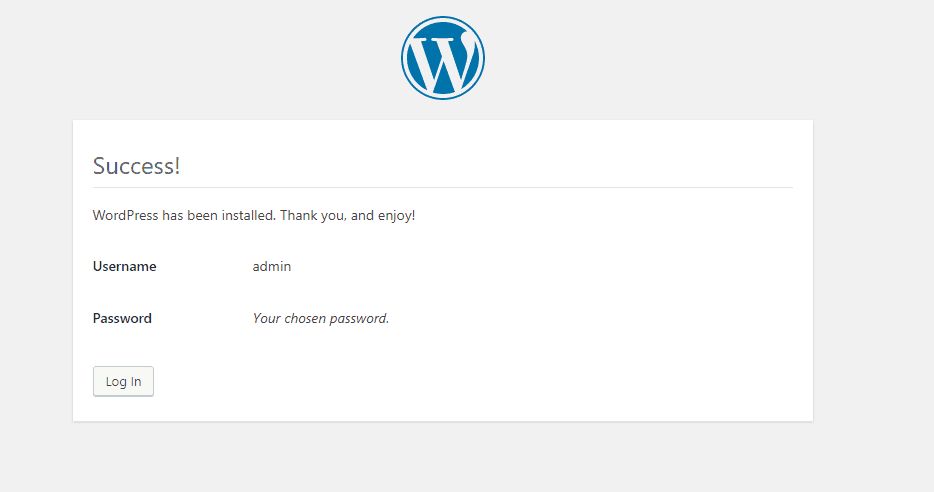
- Now visit to your site and build your WordPress website in the localhost in the way you want.
- You can visit your WordPress site anytime using the address ‘localhost/wordpress/wp-admin’. (replace ‘wordpress’ with your_site_name. )
- After your work is done you can stop ‘Apache’ and ‘MySQL’ service from XAMPP control panel.
If you still couldn’t figure it out check out the video from below.
Pros of XAMPP
- Easy to use.
- Any CMS site can be created.
- Addons can be used to extend functionality.
- Available for multiple OS platforms.
Cons of XAMPP
- No autonomous process.
- No other way but to create database every time.
- PHP, MySql version cannot be upgraded without reinstalling.
XAMPP vs WAMP
| XAMPP | WAMP |
| 1. XAMPP is available for cross platform. | 1. WAMP is only available for Windows operating system. |
| 2. Suitable for Advanced users | 2. Suitable for beginners |
| 3. Additional add-ons can be used to extend functionality. | 3. No add-ons available. |
| 4. Use High Resources. | 4. Use Low Resources. |
| 5. MariaDB as well as MySQL included | 5. Only MySQL is included. |
| 6. Perl is included in XAMPP. | 6. Perl is not included in WAMP. |
| 7. XAMPP-VM is available for Mac OS X | 7.Only available for Windows. |
| 7. XAMPP is available for cloud (Google Cloud, Amazon AWS, Microsoft Azure. | 7. Not available for cloud. |
Wamp

Wamp is windows based web development environment. It allows you to create any Cms site and web applications with php, apache and MySQL database. If you are using any other operating system other than Windows, than this localhost server is not for you.
Follow the below instructions to know the answer to the question ‘how to install wordpress on localhost wamp’.
How to Install WordPress Using WAMP
To install WordPress localhost using Wamp –
- First, download it from the official location.
- Choose your preferred download option, e.g. If you are using windows 64 bit then choose (X64).
- Install the WAMP in the default way or change the installation directory as you required.
You have successfully installed WAMP server on your pc. Now it’s time to install WordPress. But before installing WordPress –
- Run the WAMP control panel.
- Left-click once on the WAMP tray icon and start all services.
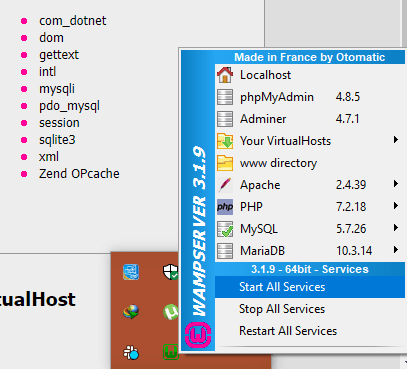
- Now open your browser and go to ‘localhost/phpmyadmin’.
- On the ‘Username’ field type ‘root’ and left the password field empty. Then hit Go button.
Now let’s create a Database for your site.
- Click on the ‘new button’ from the top left corner.
- Put your database name and click on the ‘create’ button. (I have created a database named ‘wamp_site’.)
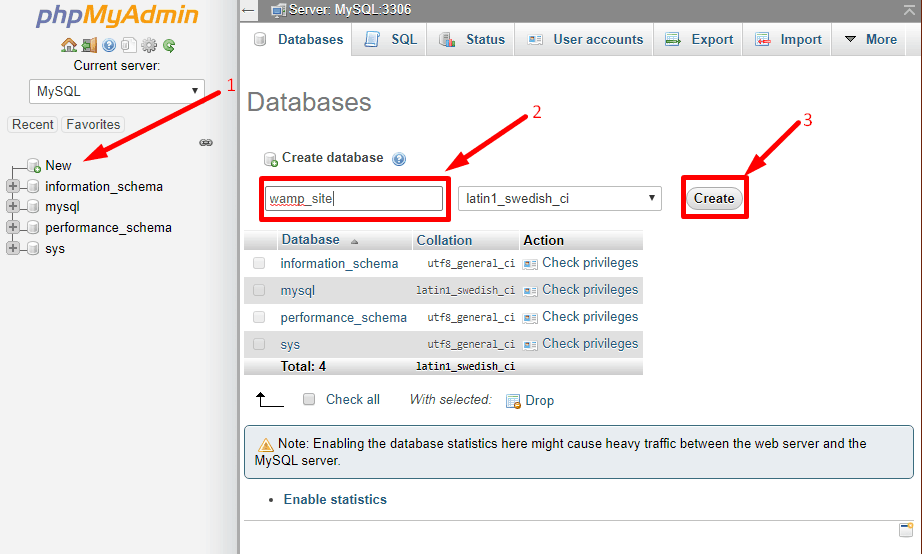
Database creation is done! Now let’s start installing WordPress.
- Download the WordPress from ‘wordpress.org’.
- Extract the zip file and rename to your preferred site name. (I have renamed it to wamp_site)
- Put the folder in your www directory. The default location of wamp directory is (C:\wamp64\www)
- From your browser go to ‘localhost/your_site_name’. (I am entering this address ‘localhost/wamp_site as my site name is wamp_site’.)

- Choose your language and click on the ‘Continue’ button.
- Now put your database name, user name, and password to run the installation.

- Give your site details and hit the ‘Install WordPress’ button.

Congrats! You have successfully installed WordPress on your localhost with WAMPP. Now login to your site with the details you have used during the installation of WordPress.

- Now visit to your site and build your WordPress website in the localhost in the way you want.
- You can visit your WordPress site anytime using the address ‘localhost/wordpress/wp-admin’. (replace ‘wordpress’ with your_site_name. )
- After your work is done you can stop services from WAMP control panel.
Pros of WAMP
- Any one can create a site easily.
- All types of CMS sites can be created.
- Additional Apache, php or MySql can be installed manually.
Cons of WAMP
- No autonomous process.
- You have to go through the same tedious process all the time to create a local site.
- Only available for Windows platform.
XAMPP vs MAMP
| XAMPP | MAMP |
| 1. Include your favorite apps with help of XAMPP add-ons. | 1. No add-ons available. |
| 2. Only Apache is available. | 2. Apache alternative nginx is included. |
| 3. Data cannot be synced as there is no cloud. | 3. Hosted data can be hosted through Dropbox. |
| 4. There is no text editor in XAMPP. | 4. Text editor comes with pro version. |
| 5. It’s not possible to publish WordPress through XAMPP. | 5. Publish WordPress directly from MAMP. |
| 6. WordPress site cannot be imported from Live Server. | 6. Import WordPress site from Live Server. |
| 7. Snapshot cannot be created. | 7. Easy to create snapshots. |
| 8. Need to edit php.ini file to change the php version. | 8. Easy to switch on multiple php version. Like php 5.3 or php 7.xx. |
| 9. No app/extension is available to check mobile view or responsive test. | 9. MAMP Viewer app is available for ios and android to check responsive and mobile view test. |
Mamp

Mamp is one of the popular local server environment that can be easily installed in windows and macOS. It doesn’t matter if you prefer to work with apache or Nginx, you will always be able to choose your preferred one.
How to Install WordPress Using MAMP
To install WordPress using Wamp –
- First, download it from the official location.
- Choose your preferred download option, e.g. If you are using windows then choose MAMP for Windows.
- Install the MAMP in the default way or change the installation directory as you required.
You have successfully installed MAMP on your pc now you install WordPress. But before installing WordPress –
- Run the MAMP control panel.
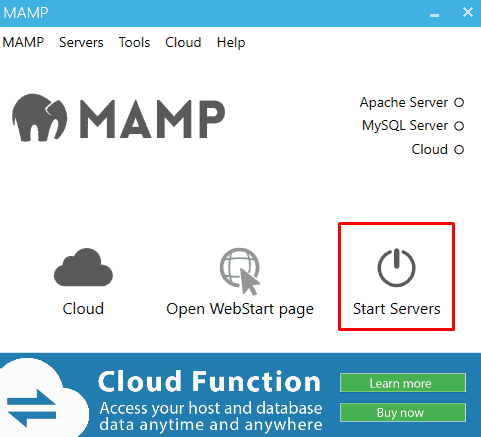
- Now click on ‘Start Servers’. This will start Apache and MySQL service on your computer.
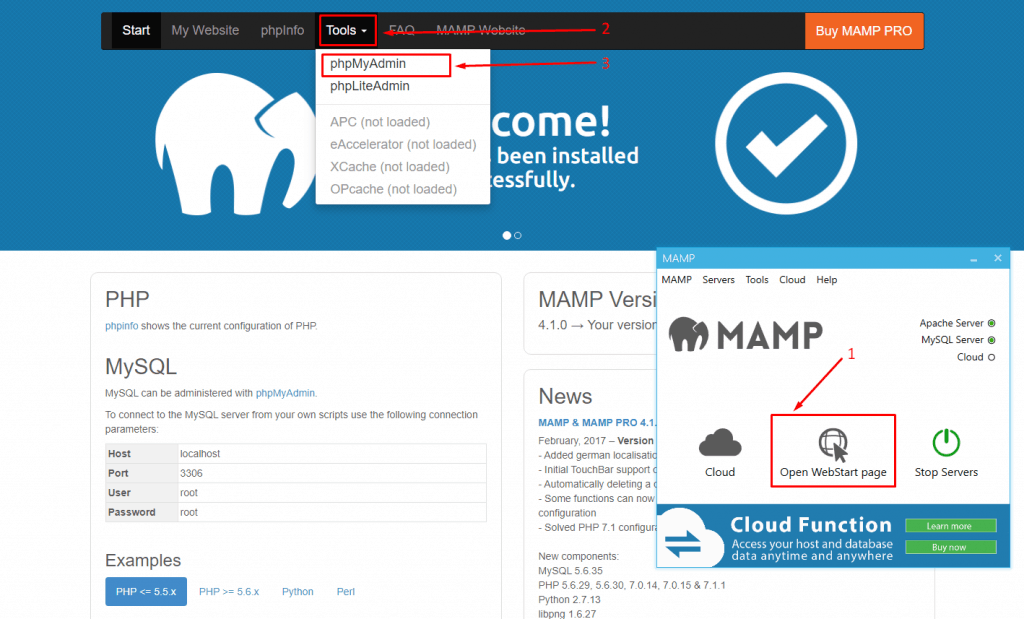
- Now click on ‘Open WebStart Page’.
- From menu bar click on Tools and select phpMyAdmin.
Now let’s create a Database for your site.
- Click on the ‘new button’ from the top left corner.
- Put your database name and click on the ‘create’ button. (I have created a database named ‘mamp_site’.)
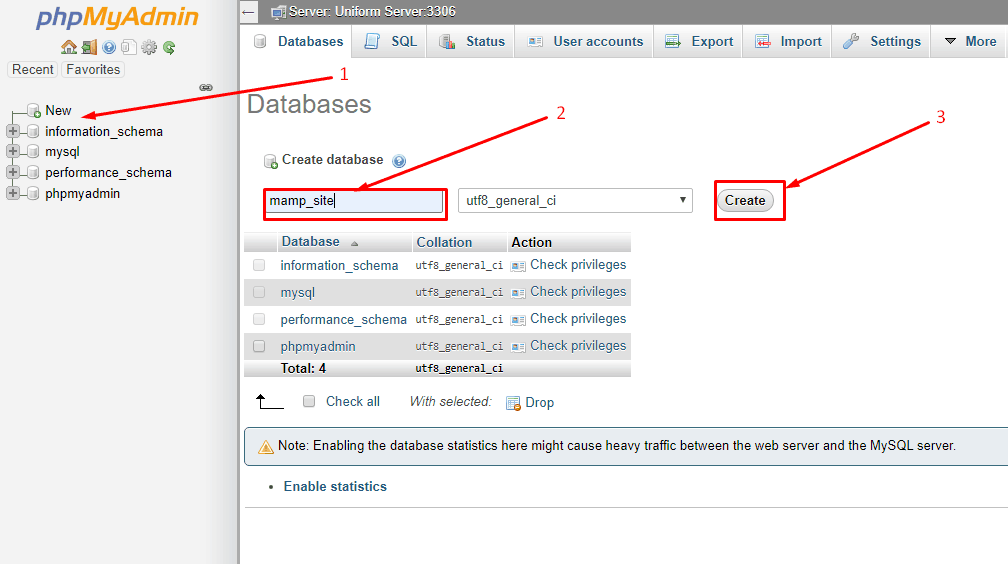
Database creation is done! Now let’s start installing WordPress.
- Download the WordPress from ‘wordpress.org’.
- Extract the zip file and rename to your preferred site name. (I have renamed it to mamp_site)
- Put the folder in your htdocs directory. The default htdocs location of mamp directory is (C:\MAMP\htdocs)
- From your browser go to ‘localhost/your_site_name’. (I am entering this address ‘localhost/mamp_site’ as my site name is ‘mamp_site’.)

- Choose your language and click on the ‘Continue’ button.
- Now put your database name, user name, and password to run the installation. (The default database username and password is ‘root’.)

- Give your site details and hit the ‘Install WordPress’ button.

Congrats! You have successfully installed WordPress on your localhost with help of MAMP. Now login to your site with the details you have used during the installation of WordPress.

- Now visit your site and build your WordPress website in the localhost in the way you want.
- You can visit your WordPress site anytime using the address ‘localhost/wordpress/wp-admin’. (replace ‘wordpress’ with your_site_name. )
- After your work is done you can stop services from MAMP control panel.
Pros of MAMP
- Very easy to create a local site with it.
- Any sort of CMS site can be created.
- Responses very fast.
- Available for multiple OS platforms.
Cons of MAMP
- Have to install local site manually every time.
- All the features are only available with pro version only.
MAMP vs WAMP
| MAMP | WAMP |
| 1. MAMP comes with cross-platform compatibility. | 1. WAMP is only available for windows operating system. |
| 2. Both Apache and Nginx is available. | 2. Only Apache is available. |
| 3. Hosted data can be synced through Dropbox. | 3. There is no cloud option available in WAMP. |
EasyPHP

With EasyPHP you will be able to transform your computer to a ready to use personal hosting server. EasyPHP is modular portable and easy to configure, but only comes for Windows operating system.
How to Install WordPress Using EasyPHP
To install WordPress using EasyPHP –
- First, download it from the official location.
- Choose your preferred download option, e.g. If you are using windows 10 then choose DEVSERVER 17.0.
- Install the EasyPHP in the default way or change the installation directory as you required.
You have successfully installed EasyPHP on your pc now you can install WordPress. But before installing WordPress –
- Run the EasyPHP control panel.
- Now go to your tray and open dashboard.
- Dashboard will open on your browser. Now start ‘HTTP SERVER’ and ‘DATABASE SERVER’.
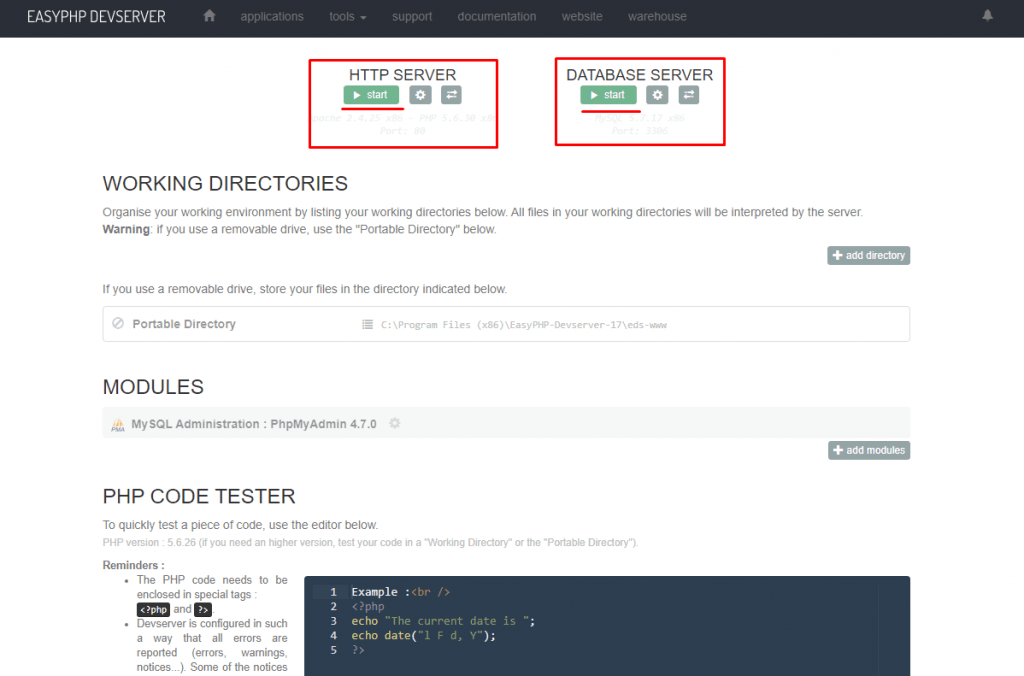
- From the MODULES menu click on the open button. This will open phpmyadmin dashboard.
Now let’s create a Database for your site.
- Click on the ‘new button’ from the top left corner.
- Put your database name and click on the ‘create’ button. (I have created a database named ‘easyphp_site’.)
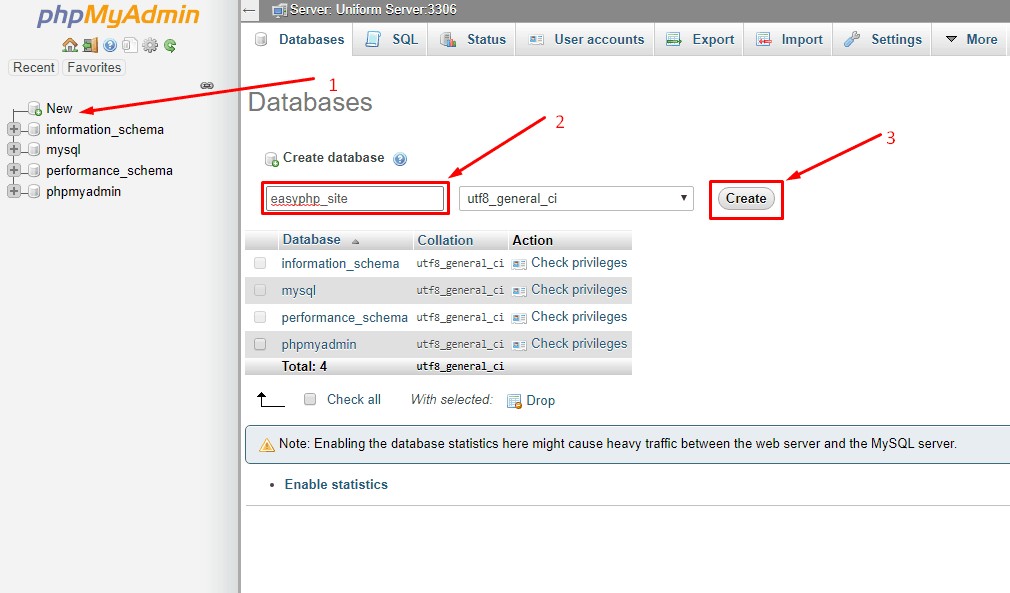
Database creation is done! Now let’s start installing WordPress.
- Download the WordPress from ‘wordpress.org’.
- Extract the zip file and rename to your preferred site name. (I have renamed it to easyphp_site)
- Put the folder in your portable directory. The default portable directory location of easyphp (C:\Program Files (x86)\EasyPHP-Devserver-17\eds-www)
- From your browser go to ‘localhost/your_site_name’. (I am entering this address ‘localhost/easyphp_site’ as my site name is ‘easyphp_site’.)

- Choose your language and click on the ‘Continue’ button.
- Now put your database name, user name, and password to run the installation. (The default database username is ‘root’ and leave the password field empty.)

- Give your site details and hit the ‘Install WordPress’ button.

Congrats! You have successfully installed WordPress on your localhost with Easyphp. Now login to your site with the details you have used during the installation of WordPress.

- Now visit your site and build your WordPress website in the localhost in the way you want.
- You can visit your WordPress site anytime using the address ‘localhost/wordpress/wp-admin’. (replace ‘wordpress’ with your_site_name. )
- After your work is done you can stop services from Easyphp control panel.
Pros of EasyPHP
- Open source.
- Easy to configure.
- Additional modules can be installed.
Cons of EasyPHP
- Only comes for windows OS.
XAMPP vs AMPPS
| XAMPP | AMPP |
| Need low resources | 1. Need high resources |
| Softaculous Auto script not available | 2. Softaculous Auto script available |
| MySQL and MariaDB included. | 3. MySQL and MongoDB included. |
| Perl pre-installed.. | 4. Perl and Python preinstalled. |
| SQL Management with PHPMyAdmin | 5. SQL management with PHPMyadmin and SQLite |
| Best for Intermediate users. | 6. Best for Beginners. |
Ampps

Ampps is one of the most popular applications that allows you to focus on more rather than maintaining them. You can create multiple MySQL databases and easily maintain them with the help of ampps.
How to Install WordPress Using AMPPS
To install WordPress localhost using ampps –
- First, download it from the official location.
- Choose your preferred download option, e.g. If you are using windows then choose (X64).
- Install the AMPPS in the default way or change the installation directory as you required.
You have successfully installed WAMP on your pc now you install WordPress. But before installing WordPress –
- Run the AMPPS control center.
- Start Apache and MySQL.
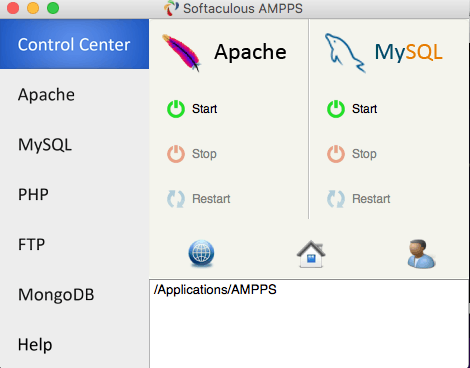
- Now open your browser and go to ‘localhost/phpmyadmin’.
Now let’s create a Database for your site.
- Click on the ‘new button’ from the top left corner.
- Put your database name and click on the ‘create’ button. (I have created a database named ‘ampps_site’.)
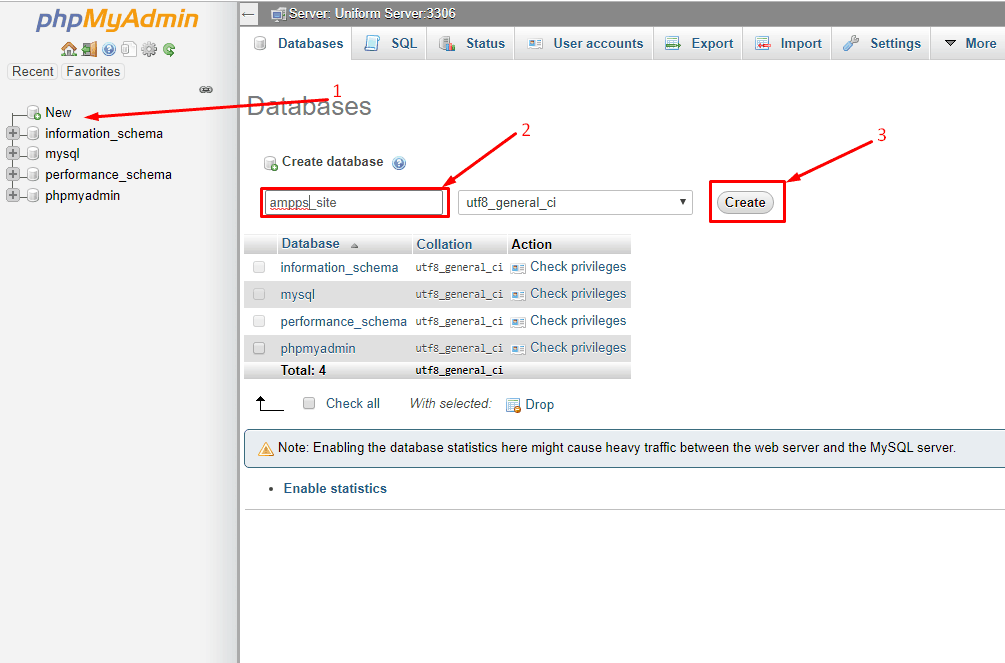
Database creation is done! Now let’s start installing WordPress.
- Download the WordPress from ‘wordpress.org’.
- Extract the zip file and rename to your preferred site name. (I have renamed it to ampps_site)
- Put the folder in your www directory. The default location of wamp directory is (C:\Program Files (x86)\Ampps\www)
- From your browser go to ‘localhost/your_site_name’. (I am entering this address ‘localhost/ampps_site as my site name is ampps_site’.)

- Choose your language and click on the ‘Continue’ button.
- Now put your database name, user name, and password to run the installation.

- Give your site details and hit the ‘Install WordPress’ button.

Congrats! You have successfully installed WordPress on your localhost with AMPPS. Now login to your site with the details you have used during the installation of WordPress.

- Now visit to your site and build your WordPress website in the localhost in the way you want.
- You can visit your WordPress site anytime using the address ‘localhost/wordpress/wp-admin’. (replace ‘wordpress’ with your_site_name. )
- After your work is done you can stop services from AMPPS control center.
Pros of AMPPS
- Any one can create a site easily.
- All types of CMS sites can be created.
- Cross platform compatibility.
Cons of WAMP
- No autonomous process.
- You have to go through the same tedious process all the time to create a local site.
AMPPS vs MAMP
| AMPPS | MAMP |
| 1. Available for Windows, Mac and Linux. | 1. Available for Windows and Mac only. |
| 2. Need high resources . | 2. No need of high resources. |
| 3. Softaculous Auto script available | 3. Need to integrate softaculous script. |
| 4.MySQL and MongoDB included | 4. Only MySQL included. |
| 5. Perl and Python preinstalled. | 5. Perl and Python not available. |
| 6. SQL management with PHPMyadmin and SQLite | 6. SQL management with MySQL. |
Uniform Server
If anyone searches for a lightweight localhost solution than it can be no other application but Uniform server. This server solution runs on any windows based OS and includes the latest version of Apache, Perl5, PHP, MySQL and MariaDB. The best part of Unifor Server is, its portable and you do not have to take any installation pain.
How to Install WordPress Using Uniform Server
To install WordPress using EasyPHP –
- First, download it from the official location.
- You don’t need to install Uniform Server. Just extract it and keep it in your preferred directory.
Now it’s time to install WordPress. But before installing WordPress –
- Run the Uniform Server controller from the folder. The controller is named as ‘UniController’.
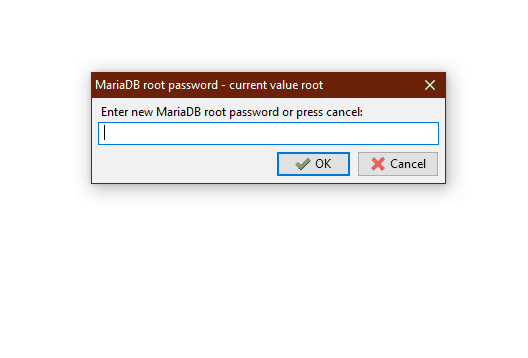
- A prompt window will open and ask for inputting a password for MariaDB. Input your desired password. (I am setting the password as ‘root’)
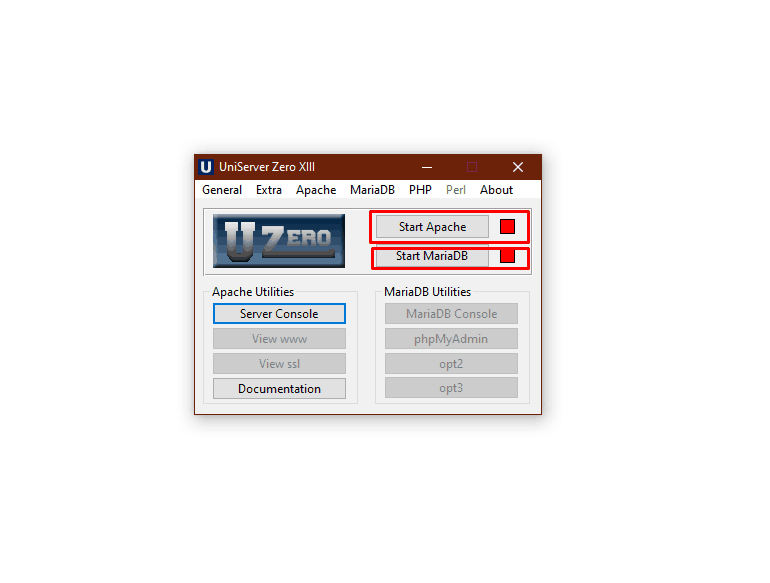
- Now start Apache service and MariaDB service.
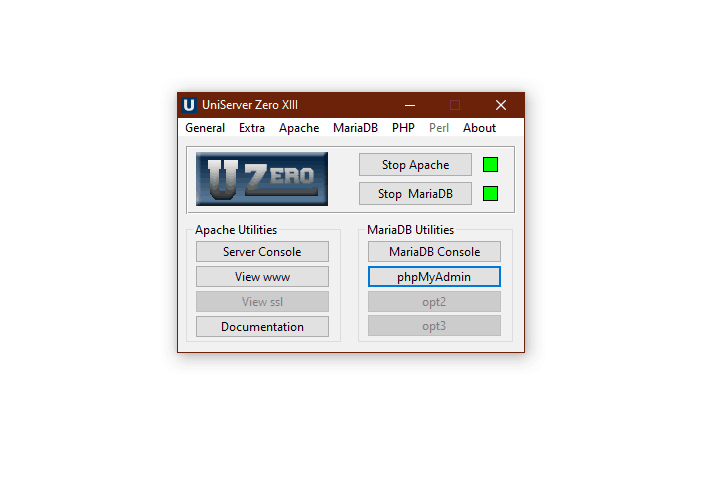
- From the MariaDB utilities, click on ‘phpMyAdmin’. This will open phpmyadmin dashboard.
Now let’s create a Database for your site.
- Click on the ‘new button’ from the top left corner.
- Put your database name and click on the ‘create’ button. (I have created a database named ‘uniserver’.)
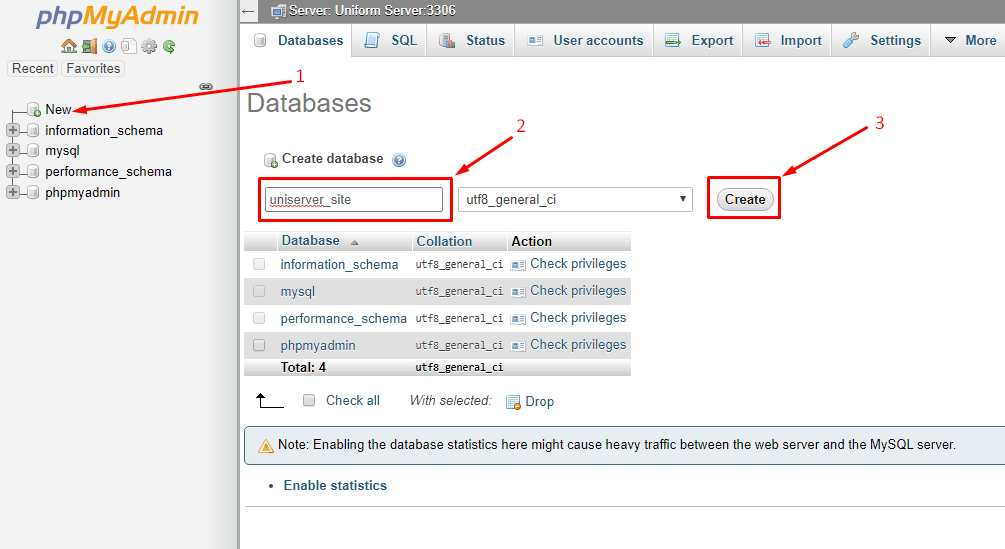
Database creation is done! Now let’s start installing WordPress.
- Download the WordPress from ‘wordpress.org’.
- Extract the zip file and rename to your preferred site name. (I have renamed it to uniserver_site)
- Put the folder in your portable directory. The default portable directory location of uniserver (C:\UniServerZ\www)
- From your browser go to ‘localhost/your_site_name’. (I am entering this address ‘localhost/uniserver_site’ as my site name is ‘uniserver_site’.)

- Choose your language and click on the ‘Continue’ button.
- Now put your database name, user name, and password to run the installation. (The default database username is ‘root’ and leave the password field empty.)

- Give your site details and hit the ‘Install WordPress’ button.

Congrats! You have successfully installed WordPress on your localhost with help of UniServer. Now login to your site with the details you have used during the installation of WordPress.

- Now visit your site and build your WordPress website in the localhost in the way you want.
- You can visit your WordPress site anytime using the address ‘localhost/wordpress/wp-admin’. (replace ‘wordpress’ with your_site_name. )
- After your work is done you can stop services from Uniserver control panel.
Pros of Uniform Server
- Very lightweight.
- Doesn’t need any installation.
- Quick apache and mysql server initialization.
Cons of Uniform Server
- Only available for windows os.
- UI is old.
Local by Flywheel

Local by Flywheel is considered as #1 local WordPress development tool. It allows you to create you WordPress localhost within in a few clicks. You don’t need to create or configure any database. All you have to do is click the add button and rest will be done by this application.
How to Install WordPress Using Local By FlyWheel
Local by Flywheel is another popular web server solution that is only available for windows. To install WordPress using Local by Flywheel –
- First, download it from the official location.
- Choose your preferred download option, e.g. If you are using windows then choose (Windows).
- Install the Local by Flywheel in the default way or change the installation directory as you required.
You have successfully installed Local by Flywheel on your pc now you install WordPress. This platform is not like any other, it’s a little bit different. You don’t need to manually create database or download WordPress package. You can directly create your site instantly.
- First run the Local Flywheel control panel.
- Now click on ‘Create a new site’.
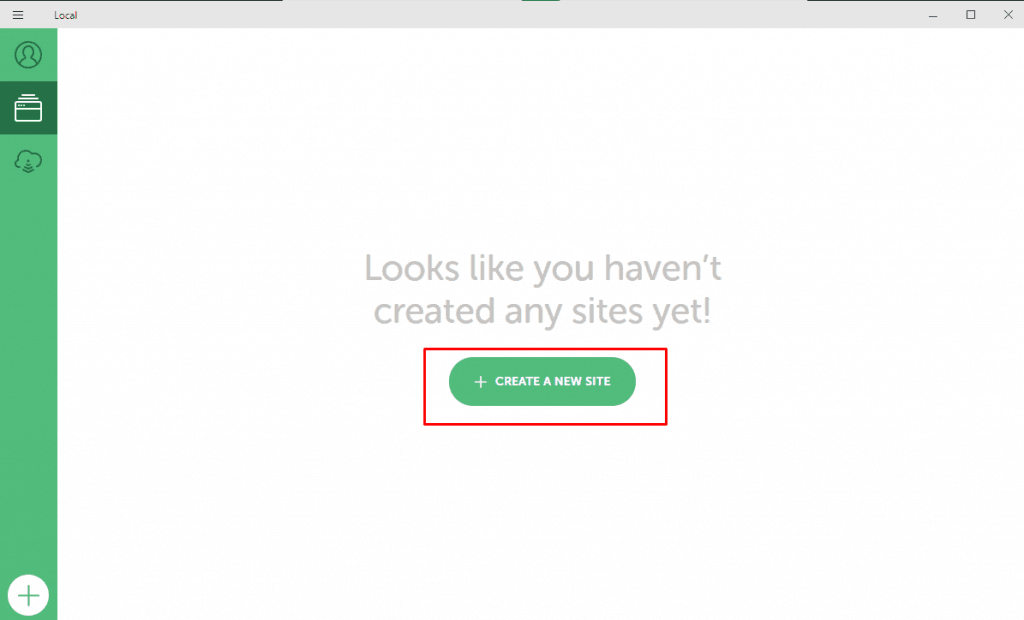
- Give a name to your site. (I have named it ‘Local by Flywheel’.)
- Now put your WordPress ‘username, password’.
- There might some popup request arrive in your screen for firewall access, click on allow button.
After a while your WordPress site will be ready
- Click on the Admin button to browse the administrator area of your WordPress website. And click on ‘View Site’ button to view your webpage.
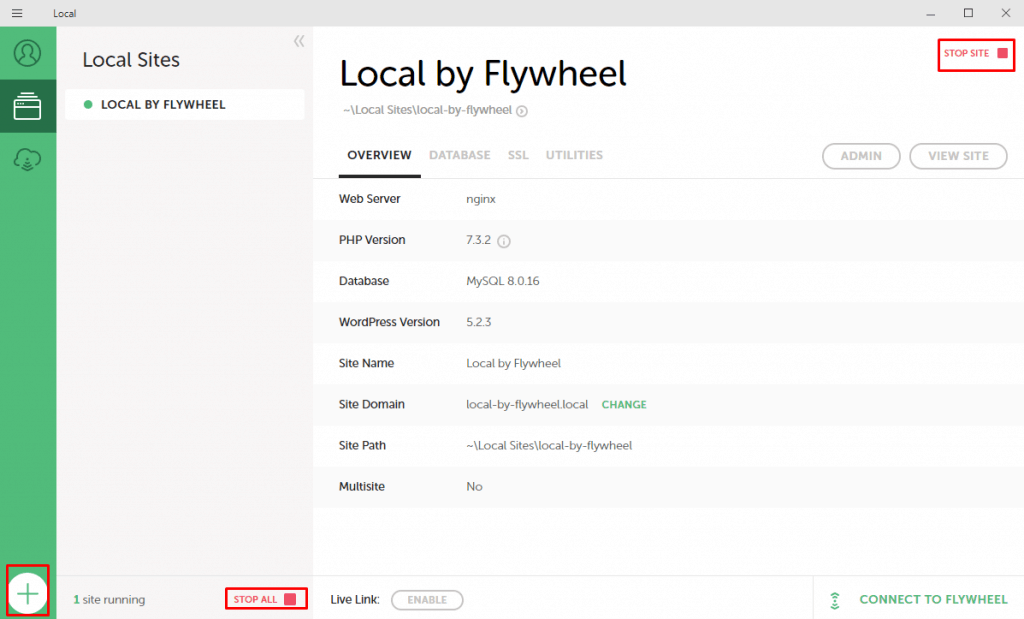
- Similarly you can add as many sites you want by clicking on the + (add) button.
If you have any problem using local by flywheel, then checkout the video below.
Pros of Local by Flywheel
- Available for multiple os platform (Mac, Windows, Linux).
- Instantly creates WordPress site.
- Addons can be used to extend functionality.
Cons of Local by Flywheel
- Only WordPress site can be created.
Laragon
Laragon is the fastest and easiest localhost application that lets you create your WordPress localhost or any other CMS site instantly. No matter what kind of development you want to do, you will always be able to do it with laragon.
How to Install WordPress Using Laragon
Laragon is another popular web server solution that is only available for windows. To install WordPress using Local by Flywheel –
- First, download it from the official location.
- Choose your preferred download option. (I suggest to choose the Laragon Lite.)
- Install the Laragon in the default way or change the installation directory as you required.
You have successfully installed Laragon on your pc. This platform is not like any other its a little bit different. You don’t need to manually create database or download WordPress package. You can directly create your site instantly.
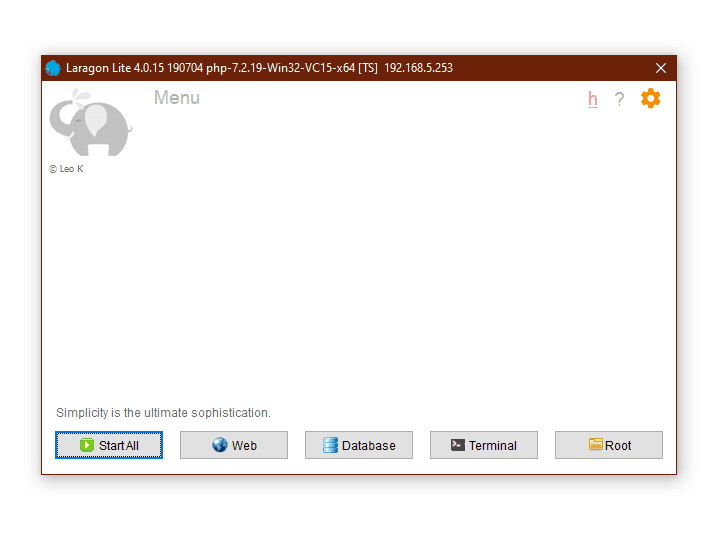
- First run the Laragon control panel.
- Now click on ‘Start All’. This will start apache and MySql server on your computer.
- Now from Menu navigate to Quickapp > WordPress.
- Write your project name(site name). Now WordPress site will be automatically downloaded and installed.
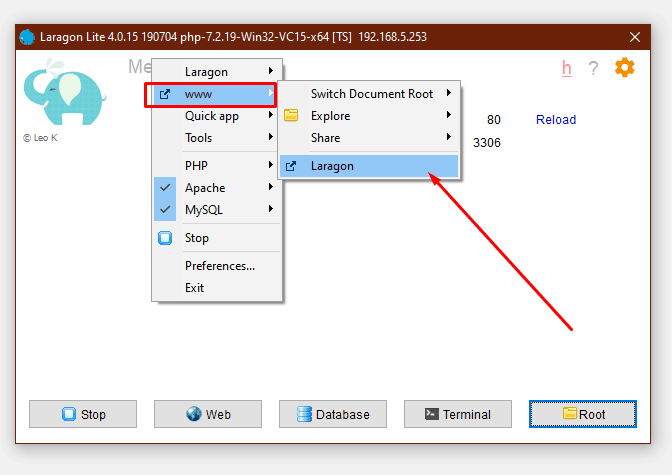
- From Menu navigate to www > your site.
- Put your Site name, user id and password.
Voila! You have successfully installed WordPress using Laragon. To add more sites, repeat the process.
- After your work is done you can stop services by clicking the Stop button.
Pros of Laragon
- Instantly creates local site, no configuration is needed.
- Multiple CMS site can be created. (e.g. WordPress, Joomla, Drupal)
- Three versions available – Portable, lite, and full.
- Multiple versions of PHP, MySQL, Apache, can be installed.
- Different extensions can be installed.
- Tutorials available.
Cons of Local by Laragon
- Only comes for windows.
Which One to Use?
All the WordPress localhost applications mentioned here are popular. But if you ask me I would suggest you different application for different operating system. If you are using Windows operating system then it’s better to use Laragon and if you are using macOS then use Local by Flywheel. Others are good but not good as these two.
Final Words
Hope after reading this guide you will be able to create your own WordPress localhost site. Choose the one that suits you best and start learning or testing in the way you want with WordPress in localhost. Hope now you know the answer to the question ‘how to install wordpress on localhost’.
If you face any problem or stuck anywhere feel free to ask me in the comment box below.


